2 Standards
Voting Wait Time Tracker
An easy-to-implement tool to help with line management at voting locations.
Intended User
Election Phase
Office Size
Estimated Time to Implement
Authoring Organization
What you’ll need
- A free Airtable account
- Names and addresses of your voting locations
- Access to update your election website
- [Optional] Pictures of your voting locations
- [Optional] Google map location of your voting locations
- [Optional] Mobile device to update wait times at voting locations
Getting Started
1. What to expect
You will need a product called Airtable. If you already have Airtable, great! If not, head on over to their site and sign up for a free account.
Once you have Airtable, you will create a new copy of the Wait Time template (called a base). You will need to add the location names and addresses, driving directions link (optional), and a site photo (optional). You don’t need to have a photo or driving directions, but it looks really great with them!
When you are ready to have poll workers update their specific site’s wait times, they will use a simple form on their phone or mobile device, choose their location, enter the wait time in minutes, and submit. This can also be done on a computer.
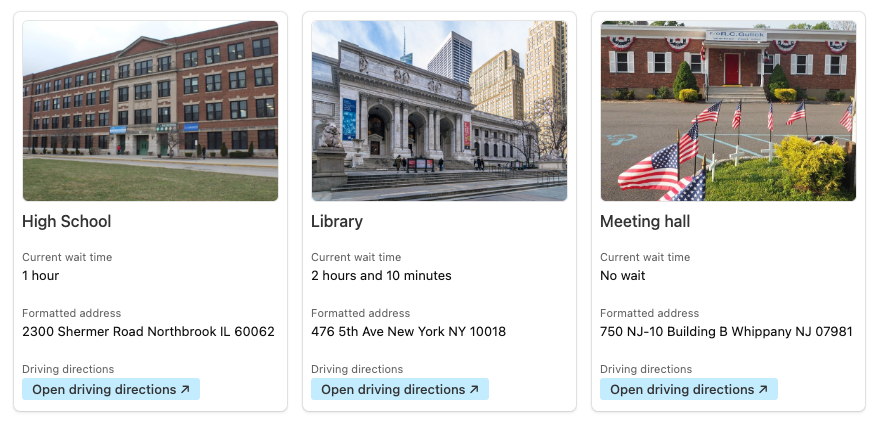
The forms information automatically updates your website with the wait time and time last updated next to each site’s photo, location and driving directions. You get something that looks like this:
2. Security
U.S. Digital Response (USDR) knows that protecting the data of your office’s dedicated poll workers and staff is crucial, and they have outlined their approaches to security in their security protocol.
Airtable is used to store and process all your location and wait-time data. They have an extensive security webpage that outlines their security certifications and protocols. All of your data in Airtable is stored in data centers in the United States.
Treat the links to your wait time forms as private. These update your live webpage and should not be shared publicly. You can also require a password to access the form.
3. Tools needed
You just need one tool: a free Airtable account.
Setting up your Airtable account
- Go to www.airtable.com and click “Sign Up for Free” in the top right corner.
- Create a free account with your work email address.
- Airtable will walk you through some “get to know Airtable” steps. It doesn’t matter what you fill in here, the template contains all the tables you need.
- When your account is created, you’ll have a popup box asking you to sign up for a 14-day Pro trial. You don’t need this, just click anywhere outside of the box and it will go away.
4. Pre-work
You can do these pre-work items while getting ready for your project:
- Gather your list of polling locations and their addresses
- Know how to make links of driving directions to polling locations, and add them to your list
- Here are instructions on how to make a link with driving directions
- Have images of all of your polling locations if you want to include them
Setting up the Wait Time Tool
- First, be sure to set up your Free Airtable account with the steps in the “Tools Needed” section above.
- Open the Wait Time Tool in Airtable Universe. Click Explore the base then Copy the base to make a copy of our template.
- Select the workspace you want to copy the base into. By default this is your personal workspace.
- Your copy of the tool will open automatically in Airtable.
- The template base has:
- Table where you list your polling locations
- A table that lists updates to location wait times
- A form to update the wait times
- Next:
- Add polling locations
- Add links to directions to polling locations
- Add polling location images, if wanted
How to update the tool with your specific locations and details
You will update all of your jurisdiction specific data, including names of polling locations, directions, and images in the “Polling Locations” table. You can edit the rows and data directly in the table, just like Excel or Google Sheets. These fields include:
- Name – The name of the location
- Photo – A photo of the entrance of the location.
- Hide – When checked, the location will be hidden from the public list
- Driving directions – Paste a link to a Google driving directions page. When a visitor clicks the “Get directions” button, they will go to this link.
- Address, city, state – The street address of the location
In addition, there are several fields like Wait times, Current wait time in minutes, and Current wait time that you cannot edit and are automatically updated.
How to hide a location
If you have a location you want to hide from the public list of locations, toggle the “Hide” checkbox. Hidden locations can still receive updates to their expected wait time.
How to view your locations as an administrator
Under the Polling locations table, you will find several different lists of all your locations:
- All locations – A list of all locations
- Active locations – Locations that are not hidden
- Hidden locations – Locations that are hidden
You can add, remove, and edit any location in any view.
How to view your current and historical wait times as an administrator
You can view all of your wait time data in the “Wait Times” table. You update this data in the “Report wait time” form, and you can view all entries to that form in the ““Latest reported wait times” grid, or grouped by location in “Wait times by location”.
Embedding the Wait Time Tool on your website
To make it easy for your voters to find wait times, you can embed the Wait Time tool in any page of your website. Embedding the tool requires getting a bit of code from your Airtable base and pasting it into your website’s editing tool.
Getting your embed code
- Click the Polling locations table tab.
- Select Embed for website on the left-side of the page under Views.
- Click the Share view button on the top right, then select Embed this view
- A preview of your Wait Time tool will appear below for both desktop and mobile devices. For a cleaner display, try turning off Show view controls.
- Copy the embed code that appears in the black box on this new page.
Embedding the code in your site
Election offices use a wide variety of website editing tools, some of which make it easy to paste your embed code directly into your page content. Others are more restrictive and prevent you from pasting embed codes directly.
If you cannot paste your code into the site and need to ask someone to help, send them these instructions along with your embed code:
“We are trying to embed a public view of an Airtable application that shows approximate wait times for polling locations. This embed is a simple iframe code that does not share personal information and is HTTPS only: [insert embed code]”
Refreshing your embed
If someone is viewing your Wait Time page and an update comes in from a polling location, the person viewing the embed tool will not see that update. While viewing the tool in Airtable means content is updated in real-time, the embed tool only updates when the page is initially loaded or refreshed.
If you would like to have the tool refresh automatically every 30 seconds, you will need to add extra code to your webpage. Share this sample code with your website team and they should be able to help you.
You can also choose to write a note on your website directing people to refresh the page to get the latest data.
Making your embedded view taller
You can make a quick edit to your embed code that makes the tool taller. This can help improve the experience for voters.
In the code, look for a section that reads height=”533″ you can change the 533 to a bigger number. This makes the embed taller.
Using the toolUsing the Tool
1. How to update wait times
- Get the form link from your Wait Time Airtable:
- In the Wait Times table, click on the Report Wait Time form
- Click the pink Share Form button at the top of the form view and select Create link to view
- Copy the link to the form
- Be careful with this link. If you would like to password protect it, you can do that with an Airtable Pro account.
- You can then use this link to update wait times yourself
- You can also send the link to people who will update wait times:
- Email the link to the form to specific poll workers, so they can complete it from a phone or tablet (if you allow devices in your polling locations)
- If you have computers set up for poll workers at your polling locations, you can bookmark this link for them and tell them to use it to update wait times
- The form can be completed many times a day for each location
- Each time a new form is submitted for a location, the Wait Time Tool will update with the new information
2. How to get help
If you need help after you’ve started using the Wait Time Tool, email elections-custom-projects@usdigitalresponse.org and someone from their team will get back to you.
Customizing for your officeCustomizing for your office
This tool is fully customizable for your office. Consider adding pictures of your polling locations. Google maps has pictures of many public buildings and these are easy to copy at the same time you are downloading driving directions in Google maps.
How do I know if this resource is helping?
Just posting this tool on your website will not be enough. You will need to advertise it so your voter’s know it’s there. Share with voters and media extensively.
Voter feedback and poll worker feedback will be your best source to know if this tool is helping or not. An added benefit will be the ability to look back on past data and plan your polling locations accordingly.
Which Values for Election Excellence does this resource support? Why?
Values for the US Alliance for Election Excellence define our shared vision for the way election departments across the country can aspire to excellence. These values help us navigate the challenges of delivering successful elections and maintaining our healthy democracy.
Alliance values are designed by local election officials, designers, technologists and other experts to support local election departments.
You may find this tool especially helpful for these Values:
- Comprehensive Preparedness, why: Informs voters of where there are long lines or where an emergency has occurred (use the notes field)
- Voter-Centricity, why: helps voters navigate and prepare for their day based on waiting-in-line times
To learn more about the Values for Election Excellence, and to see the full list, visit the Alliance website.
Sharing feedbackSharing Feedback
How was this resource developed?
This resource has been put into practice by at least one jurisdiction. Share your experience with this resource and improve it for your peers by reaching out via support@ElectionExcellence.org
How do I stay in touch?
- For the latest news, resources, and more, sign up for our email list.
- Have a specific idea, piece of feedback, or question? Send an email to support@ElectionExcellence.org