Polling place resource planner
A free program to help you estimate resource needs at a polling place.

What you’ll need
- You can use either an online version of the program, or you can download it
- Open the simulator on the web
- Download the app (.zip file, 133KB)
- Additional download instructions can be found in the “Getting started” section
- Computer with internet access
- Real or estimated data about your polling place(s): number of expected voters, number of check-in stations, number of voting stations, hours when the polls are open, average amount of time for check-in, and average amount of time for voting.
Getting started
Using the downloaded version? It downloads in a zip folder. To use the the app and related materials, you will need to extract them.
- To extract the files on a PC, right-click on the zip file and select Extract All. You’ll be prompted to choose a location. Do so, and then press Extract. Your computer will extract the files and create a new folder.
- To extract the files on an Apple computer, you can simply double-click on the zip file, and your computer will extract the files into a new folder.
Once the zip files are extracted, you can explore the folder’s contents. To use the app, click on the capacity.htm file. The folder also includes sample spreadsheets and a help file.
Getting familiar with the tool
The simulator might seem complicated at first, but it’s worth the effort to learn, and we’ll take it step by step. The best way to begin is to get familiar with the features – especially the 6 main inputs.
The inputs
You’ll plug information into the 6 main inputs to calculate wait times at your polling place. They are:
- Number of expected voters
- Number of check-in stations
- Number of voting stations
- Hours when the polls are open
- Average number of minutes a voter will take to check in
- Average number of minutes a voter will take to vote
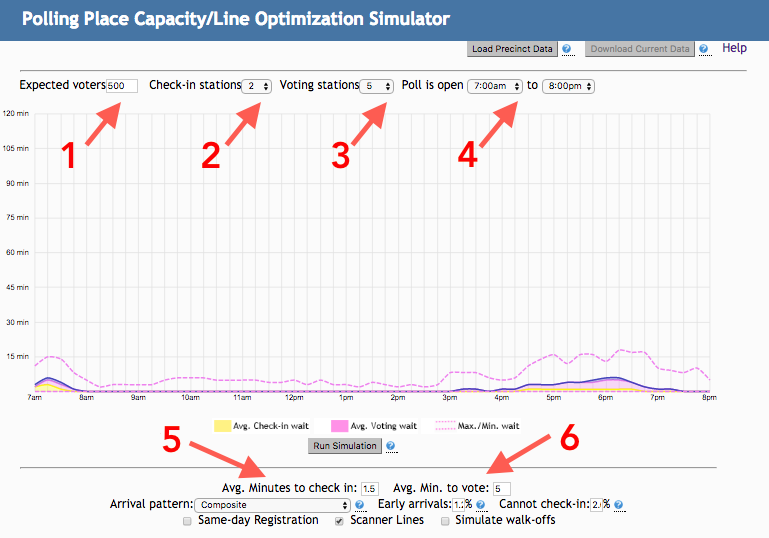
You’ll notice there are other inputs and settings beyond these 6, but don’t worry about them now. We’ll touch on those features later.
The graph
Once you’ve found the 6 main inputs, get to know the graph. The x axis shows when the polling place is open, and the y axis shows wait times. The graph displays three main values:
- Yellow: average check-in wait
- Solid pink: average voting wait
- Pink dotted lines: range of possible average wait times, hour by hour
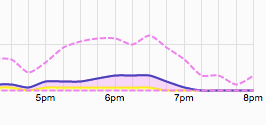
The main screenshot above shows results from the simulator’s default inputs: 500 expected voters, 2 check-in stations, 5 voting stations, and average check-in and voting times of 1.5 minutes and 5 minutes, respectively. With these default inputs, wait times are modest: even at peak times, waits are only 5-6 minutes, and even the maximum wait is only about 20 minutes.
In other words, the default settings show a polling place that is running well, without any long lines or waits to check in and vote.
But what about a real-life polling place? You’re now ready to input some real-world data and simulate real waits.
Using the ToolUsing the Tool
Simulating an Election Day
To predict capacity and wait times, you need data on your polling place. If you have data for the 6 main inputs, you’re good to go. If you don’t, you may need to do research or make estimates to create a simulation.
Voting research can be done easily in some cases. For instance, use a stopwatch to time how long it takes 5 people to read through a ballot and vote. Then, calculate an average.
If you are estimating, it’s a good practice to err on the side of high estimates, as elections rarely go as smoothly as administrators hope. For instance, if you think voters will take about 4 minutes to vote, consider entering in 5 minutes instead.
For the Election Day we are simulating here, let’s assume we have reliable data about our polling place: the Greenfield Community Center. Our data says that about 350 people vote here, with 2 check-in stations and 3 voting stations. Checking in takes an average of 2 minutes, and voting takes an average of 6 minutes. Polls are open from 7:00 a.m. to 8:00 p.m.
To begin, we’ve entered the data in the 6 fields of the simulator.
You’ll see there are two additional fields below: the percentage of early arrivals and the percentage of voters who can’t check in. We don’t have data for these, so we’ve just left the default settings.
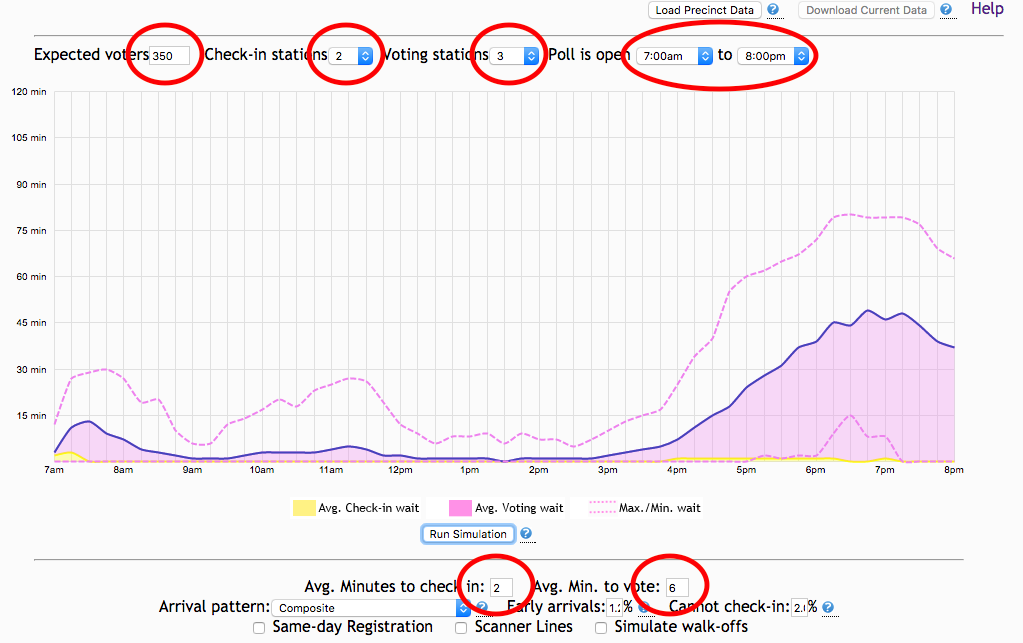
With current data about the polling place, the simulator shows expected wait times
You can see that the simulator shows pretty long voting wait times for the Greenfield Community Center, with voters waiting an average of 45 minutes during the evening rush.
This time exceeds the maximum voting wait time of 30 minutes that was recommended by the Presidential Commission on Election Administration (PCEA) in 2014. Therefore, you’ll probably want to make changes to reduce the waits.
Of course, even if your simulation showed good wait times, you still might want to make improvements.
Simulating a changed scenario
Obviously, the changes you consider will depend on the problem you’ve identified at your polling place. Because long voting waits were the problem at the Greenfield Community Center, you might think about adding more voting stations.
Space is small at this polling place, but there is room for one more booth, and you are curious to see if adding it would reduce the wait. With the other 5 data inputs remaining the same, you change the number of voting stations from 3 to 4.
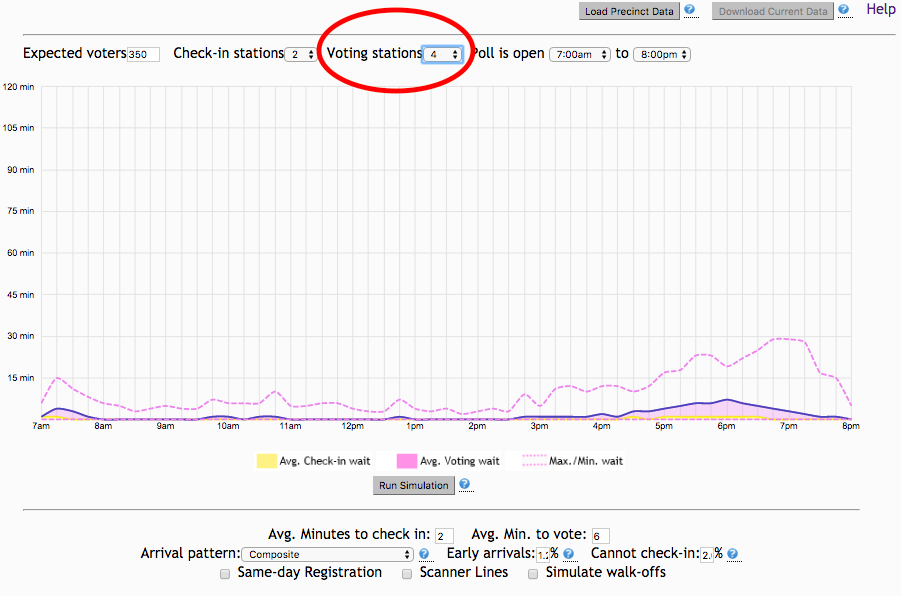
With an additional polling place, the most likely average wait time is closer to just 7 minutes
What a difference that extra voting booth has made! Before the change, the evening rush had an average voting wait of 45 minutes, but now with 4 booths, the most likely average wait has been reduced to about 7 minutes. This means a much better experience for voters and a calmer environment for election workers.
Experimenting with different changed scenarios
Bear in mind that there are lots of ways to deal with strained capacity at a polling place. We saw that adding a voting booth at the Greenfield Community Center would help, but that doesn’t mean it’s the only or even the best thing that would help.
As you consider changes, make a list of possible approaches to the problem along with their cost, staffing requirements, size, and other needs. Aim for an approach that will have the broadest impact but use the fewest resources.
Maybe instead of adding a voting booth, you want to try a different solution.
To help with waits, you could add poll workers for the evening shift to reduce lines that build up at the end of the day. To reduce voting time, you could mail sample ballots to voters so that they’d have more time to prepare in advance. Or, let’s say you have research showing that providing informative voter materials at the polling place could reduce voting time from 6 minutes to 5. None of these are changes you can introduce just before an election, but they’re worth considering in long-range planning.
For our example here, we’re going to test the results of introducing informative voter materials to the polling place as a way to reduce voting time from 6 minutes to 5.
If you want to reduce minutes to vote, helping voters prepare for initiatives and referenda is especially important because research shows that voting on ballot measures takes much more time in the voting booth than voting on races. One useful approach is to create posters or handouts with the text of initiatives and referenda and then make these materials available at the polling place. This way, voters can review the measures while they wait and prepare their votes in advance.
Let’s use the simulator again to test this new scenario, changing the number of voting stations back to 3 and reducing the number of average minutes to vote to 5.
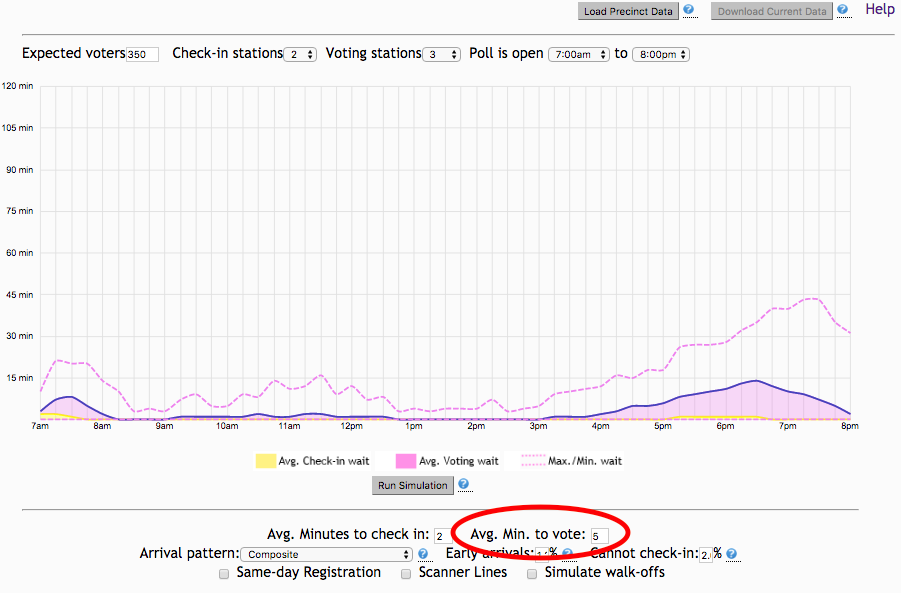
You can see that if the informative posters or handouts could reduce voting time to 5 minutes, the voting wait times would be greatly reduced, with maximum waits of about 14 minutes.

This reduction is not quite as much as with the extra voting booth, but it’s still well below the 30-minute PCEA guideline. And unlike the booth, this intervention might result in better-informed voters and fewer undervotes. So, you may decide that the best option in the long term is to rally support for informative materials rather than the quick fix of adding more voting stations.
As you think about how to estimate and reduce voter wait times, keep in mind that the factor that contributes most to wait times is the number of minutes it takes to vote. Voting time is the most important piece of data for the simulation, but it’s also the most elusive: accounting for different ballots, different equipment, and different people makes estimating voting times challenging.
Considering the implications
Remember that running a simulation can predict waits, but it can’t tell you the best way to improve a polling place. To make improvements, you need to make your own judgments, weighing the outcomes predicted by the simulator against additional real-world concerns like resources, staffing, and the physical space of the polling station.
The bottom line is, you should use the simulator to experiment with various solutions and predict their results. Try different scenarios to find the change that works the best, has the lowest cost, and so on. Then, you can use the data to appeal to decision makers and other stakeholders.
For example, referring to the simulator can help you make an argument about budget decisions. With data, you may have a stronger case for persuading your county or state leaders that more, or different, resources are needed in your area.
Keep in mind that voter wait times are a serious issue — one of interest to the media, candidates, political parties, and the public at large. In contested elections, long waits at the polls have sometimes resulted in legal action taken against election administrators.
For these reasons, you should be mindful about the fact that internal decisions about polling place management may be subject to scrutiny by others as the result of a legal challenge. Document your decision-making process carefully and don’t place blind faith into this or any other resource allocation tool. While this simulator is powerful, it can provide only estimates — not guarantees.
Exploring the advanced features
The steps above will help you get started, but the simulator has additional features that you may find helpful.
Importing and exporting data as Excel spreadsheets
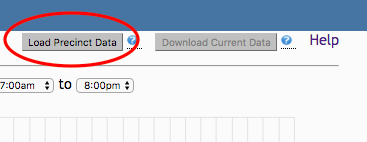
If you already have data on polling places in a spreadsheet, you can import the data into the simulator. This allows you to load and display data from multiple polling places quickly and easily. You can use any tab-delimited files (e.g., CSV files), and the link below includes simple instructions for creating a spreadsheet.
Likewise, you can export data from the simulator into Excel. This is helpful for creating an archive of simulator data.
For details, check out the simulator’s help page and, going to the top left, click on Load Your Own Data.
Including additional polling place factors
Does your state allow same-day registration? Do you want to predict how many people might walk off without voting if lines are long? You can add these factors to see their impact on capacity:
- Early arrivals: This feature allows you to account for voters who are already waiting at a polling place when the polls open. By default, this field presumes 1.2% of expected voters will be early arrivals. If you have different data, you can replace the default.
- Cannot check in: This input allows you to factor in would-be voters who are unable to check in but still contribute to check-in wait times. By default, this field presumes 2% of polling place visitors will be unable to check in. If you have different data, you can replace the default setting.
- Same-day registration: This selection adjusts times to account for on-site, same-day registration.
- Scanner lines: This selection adjusts times to account for scanning of ballots, which may be time consuming depending on equipment.
- Simulate walk-offs: This selection estimates the number of would-be voters who leave the polling place instead of enduring long waits.

Selecting specific arrival patterns
Do you have reliable data on the busiest times at your polling place? By default, the simulator uses a composite in order to calculate voter arrival patterns – in other words, it combines all possible arrival patterns into an average. But if you have a clear sense of your polling place’s specific arrival patterns, you can select one using the Arrival pattern drop-down menu.
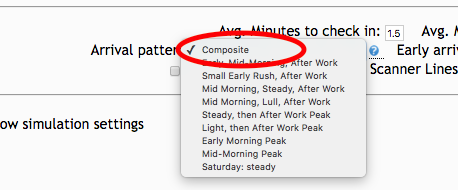
Arrival patterns can vary greatly by location (between urban and rural areas, for instance). And different patterns produce very different simulations.

Changing simulation settings and arrival patterns
By default, the program crunches the numbers 20 times to make a simulation, but you can alter this number if you like. You can also change the way that arrivals are understood by the simulator and displayed on the graph. And you can choose whether to display the range of average wait times (pink dotted lines) or not.
To access these features, go below the simulator graph and click the + sign next to Show simulation settings.

To read more about these advanced simulation settings and arrival patterns, visit the simulator’s help page and, going to the top left, clicking on Settings.
Consulting additional resources
The Caltech/MIT Voting Technology Project hosts a valuable collection of resources for managing polling places. On this site, you might be especially interested in:
