Voting Timer App
A free app to measure the average time voters spend with a ballot.

What you’ll Need
- Mobile device with internet access
- Staff member to monitor voting activity at a polling place
- Computer with internet access
- Microsoft Excel (for using voting stats spreadsheets)
Getting Started
he Voting Timer is a mobile web app, which means that it works on any smartphone or mobile device without requiring download or installation. You can use the app on a computer, but the app is built for use with mobile devices.
Start by connecting to wifi or mobile internet service. Later, you can use the timer in areas without internet service, but you need internet to provide initial information about your location.
Begin the process by going to the Voting Timer website in your mobile browser.
You’ll first see a page of information that introduces the timer and how it works.
To make it easier to get to the app later, we recommend adding a shortcut to the app on your mobile device’s home screen. Having this shortcut means that when you want to use the app later, you won’t have to manually navigate to the website.
Providing your information
Once you’ve viewed the introduction for the Voting Timer, tap Continue. The app will prompt you to provide information about your location, ballot, and voting method.
For the sake of research, we recommend you provide this information, but we understand you may want to practice with the app anonymously first.
If you just want to experiment with the timer without sending your results or downloading your data, you can skip the steps asking for information and remain in Practice Mode. If that’s your plan, you can now skip to the Using the Tool section below.
Or, if you want to use the app for a mock election or pilot study, when it comes time to enter your location information, just select “Testing” (at the top of the list) for the County and Locale inputs. This will categorize your data as experimental and not part of an actual election.
Location information
First, provide information about your state, local election authority (county or municipality), and precinct or polling place.
Your device may ask permission to share your location. Respond Yes or OK. This data will help researchers verify that your physical location matches the location you provide.
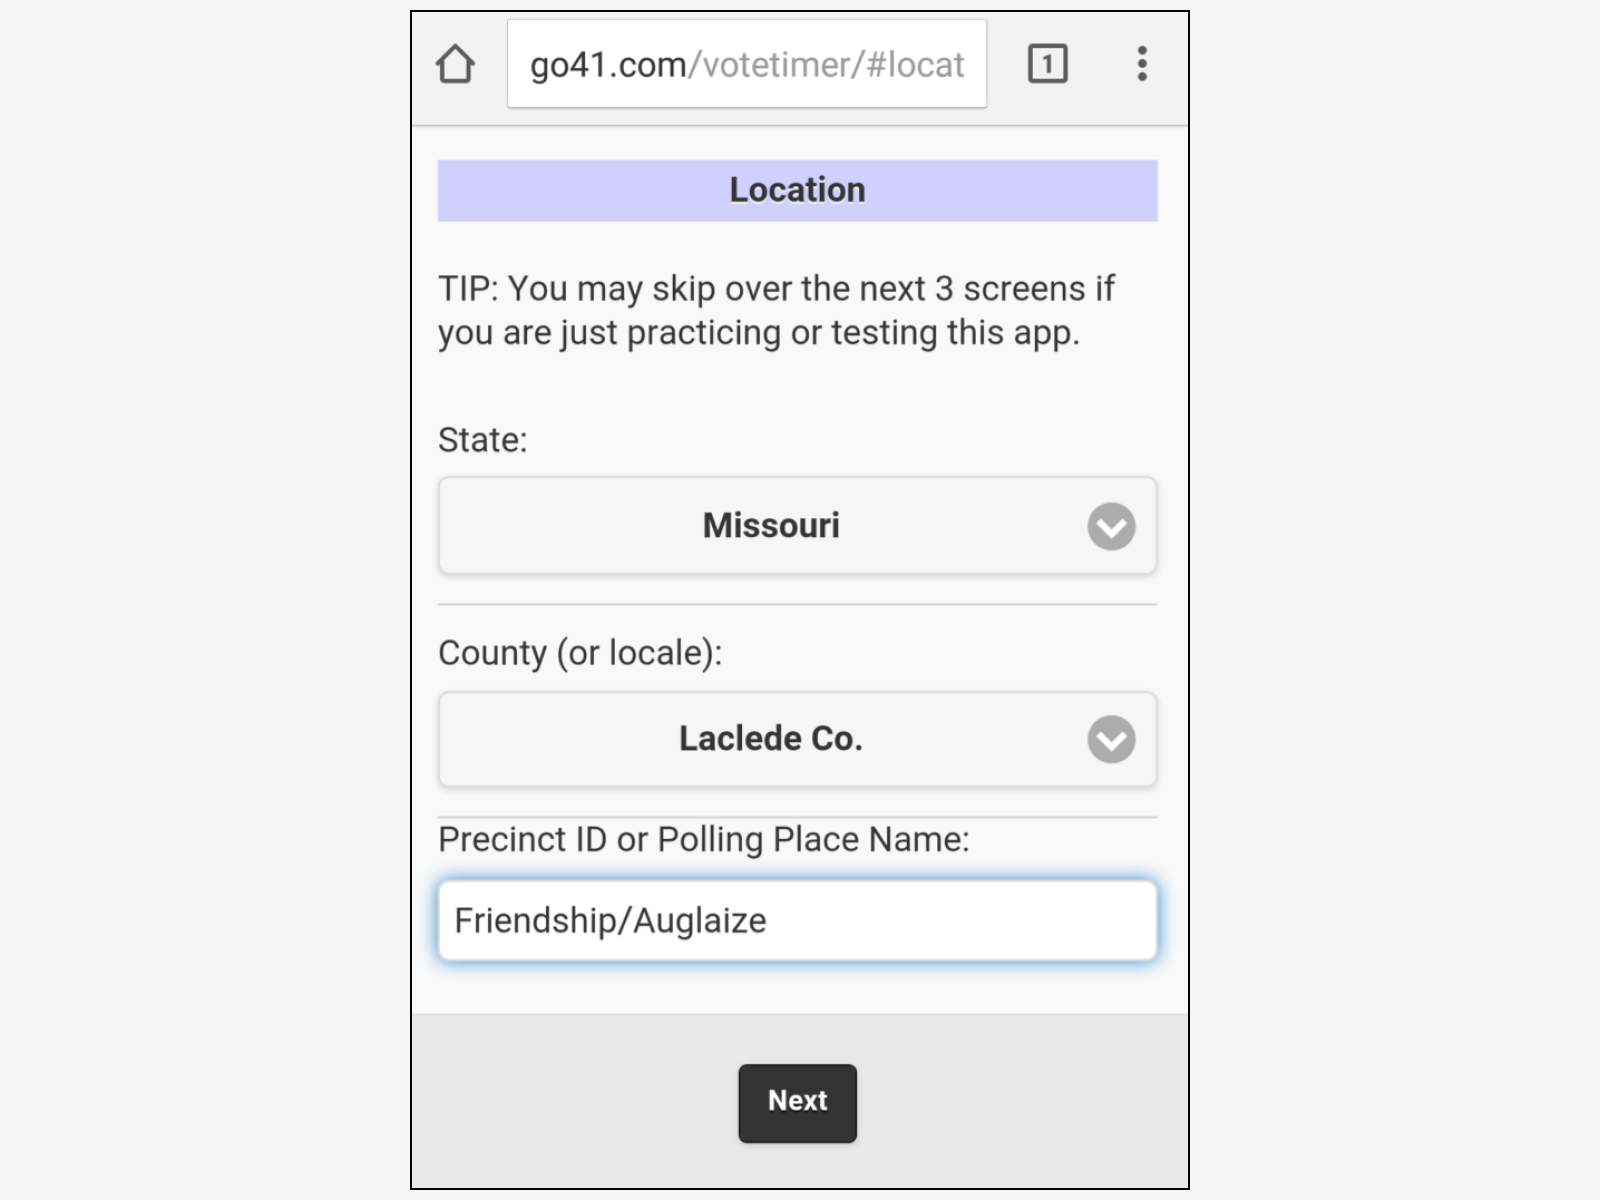
Using the drop-down boxes, select your state and your county or municipality. If you’re just testing the tool, select “Testing.”
Then, type the name, number, or a descriptor for your polling place. If only testing, write “Testing” or leave blank. When done, tap Next.
Ballot details
Now, enter information about your ballot. These details are important because most ballots contain several kinds of prompts, each of which demands a different amount of time and attention. By logging details about the ballot, you help control for those variables.
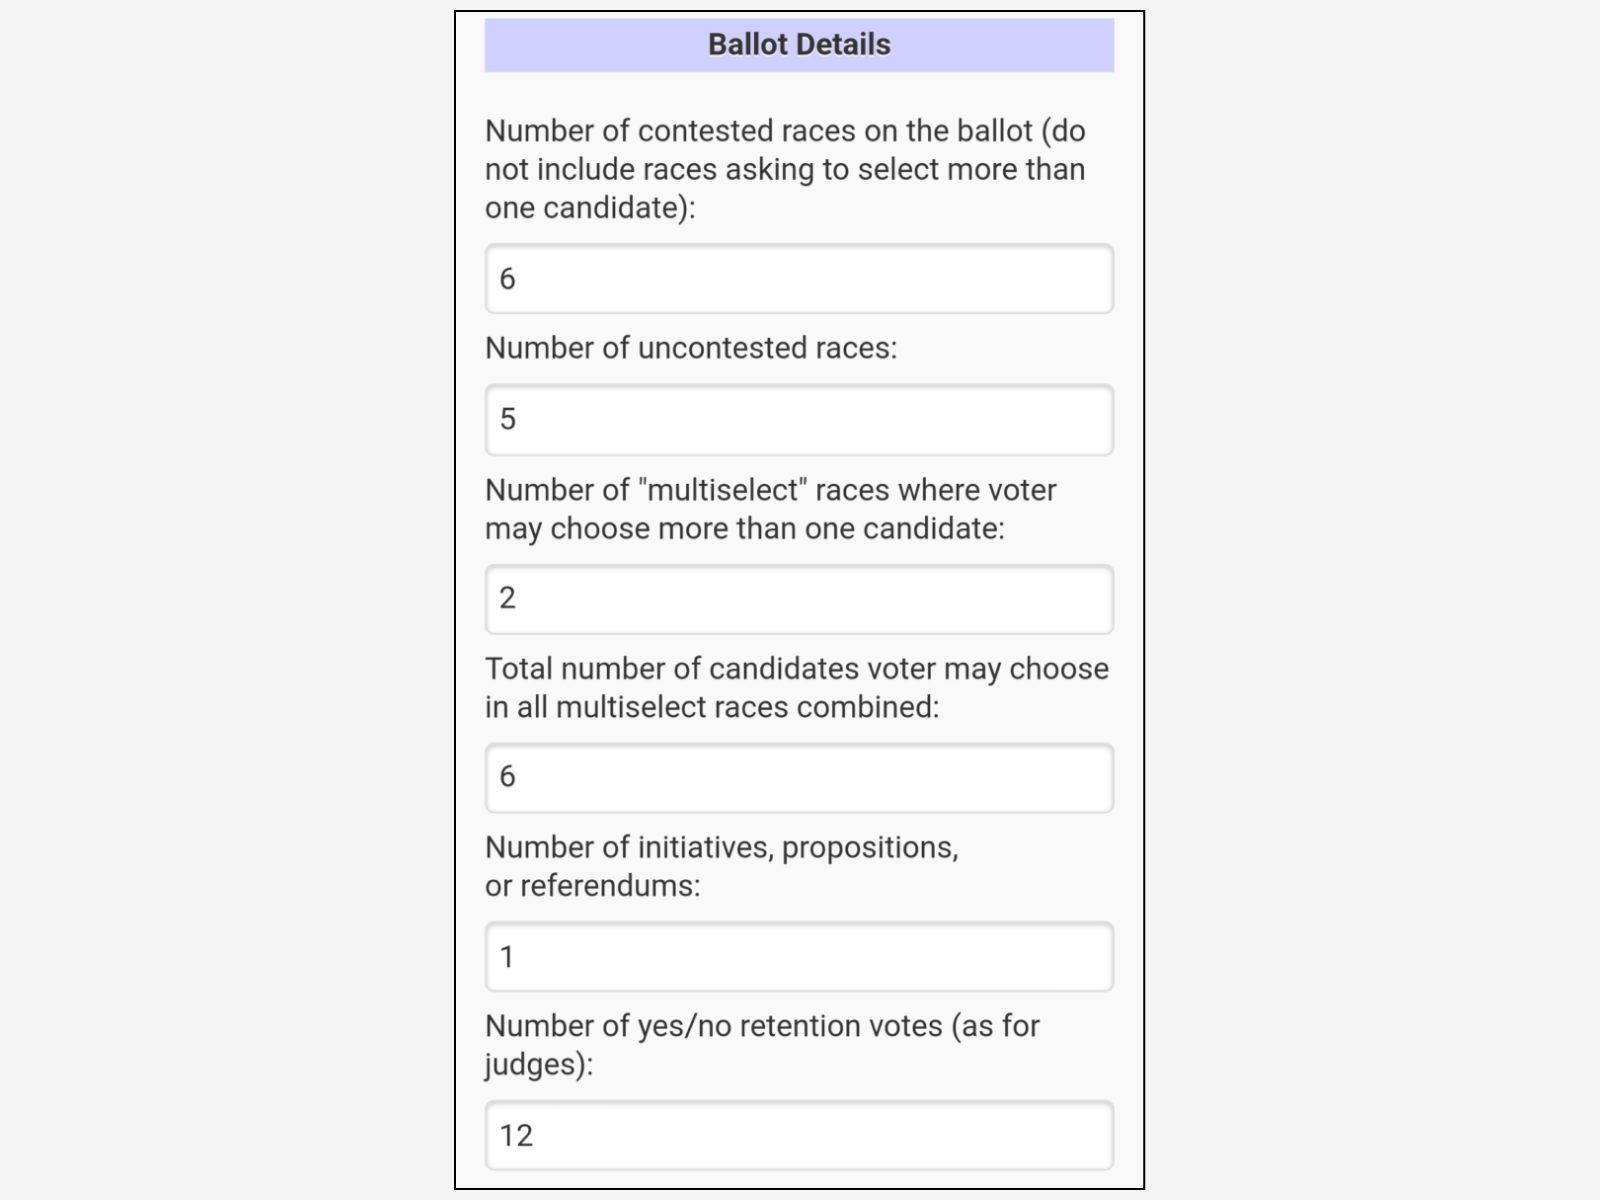
To produce consistent results, you should only time voters who are using the same ballot. Keep this in mind if you have more than one ballot at your polling location.
You should only time more than one ballot if doing so makes sense for your research goals (for instance, if you want broad data about voting times at a vote center with multiple ballots). If you’re timing more than one ballot, enter “0” for all the inputs on the Ballot Details page so that your data will make sense to the researchers.
Enter the number of contested races. Here’s an example from a sample ballot:

Enter the number of uncontested races. Here’s an example:

Enter the number of “multiselect” races, in which voters select more than one candidate. The example below contains 2 multiselect races.
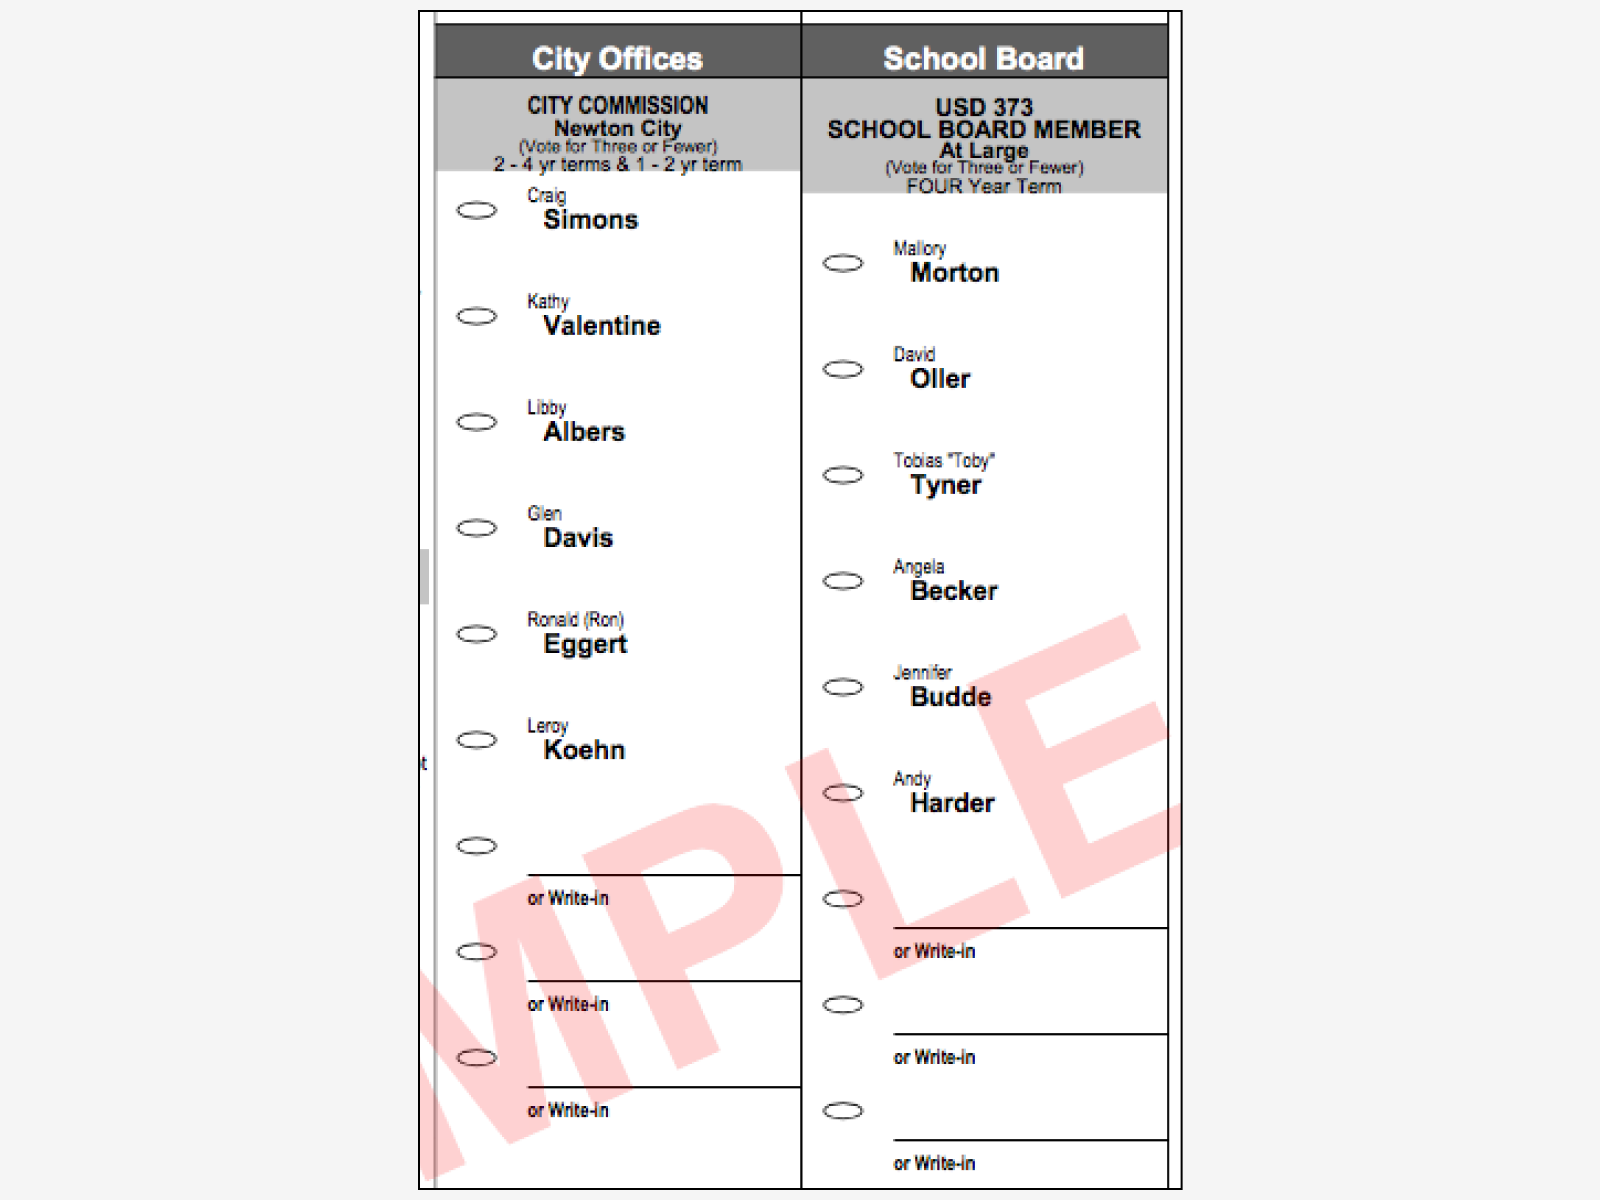
Still looking at any multiselect races on your ballot, next enter the total number of options the voter may select in all multiselect races. Since we have 2 such races, and in each race the voter makes 3 (or fewer) selections, we enter 6 for this field. If you have 0 multiselect races, enter 0 for this field, too.
Enter the number of initiatives, propositions, or referendums. Here’s an example:
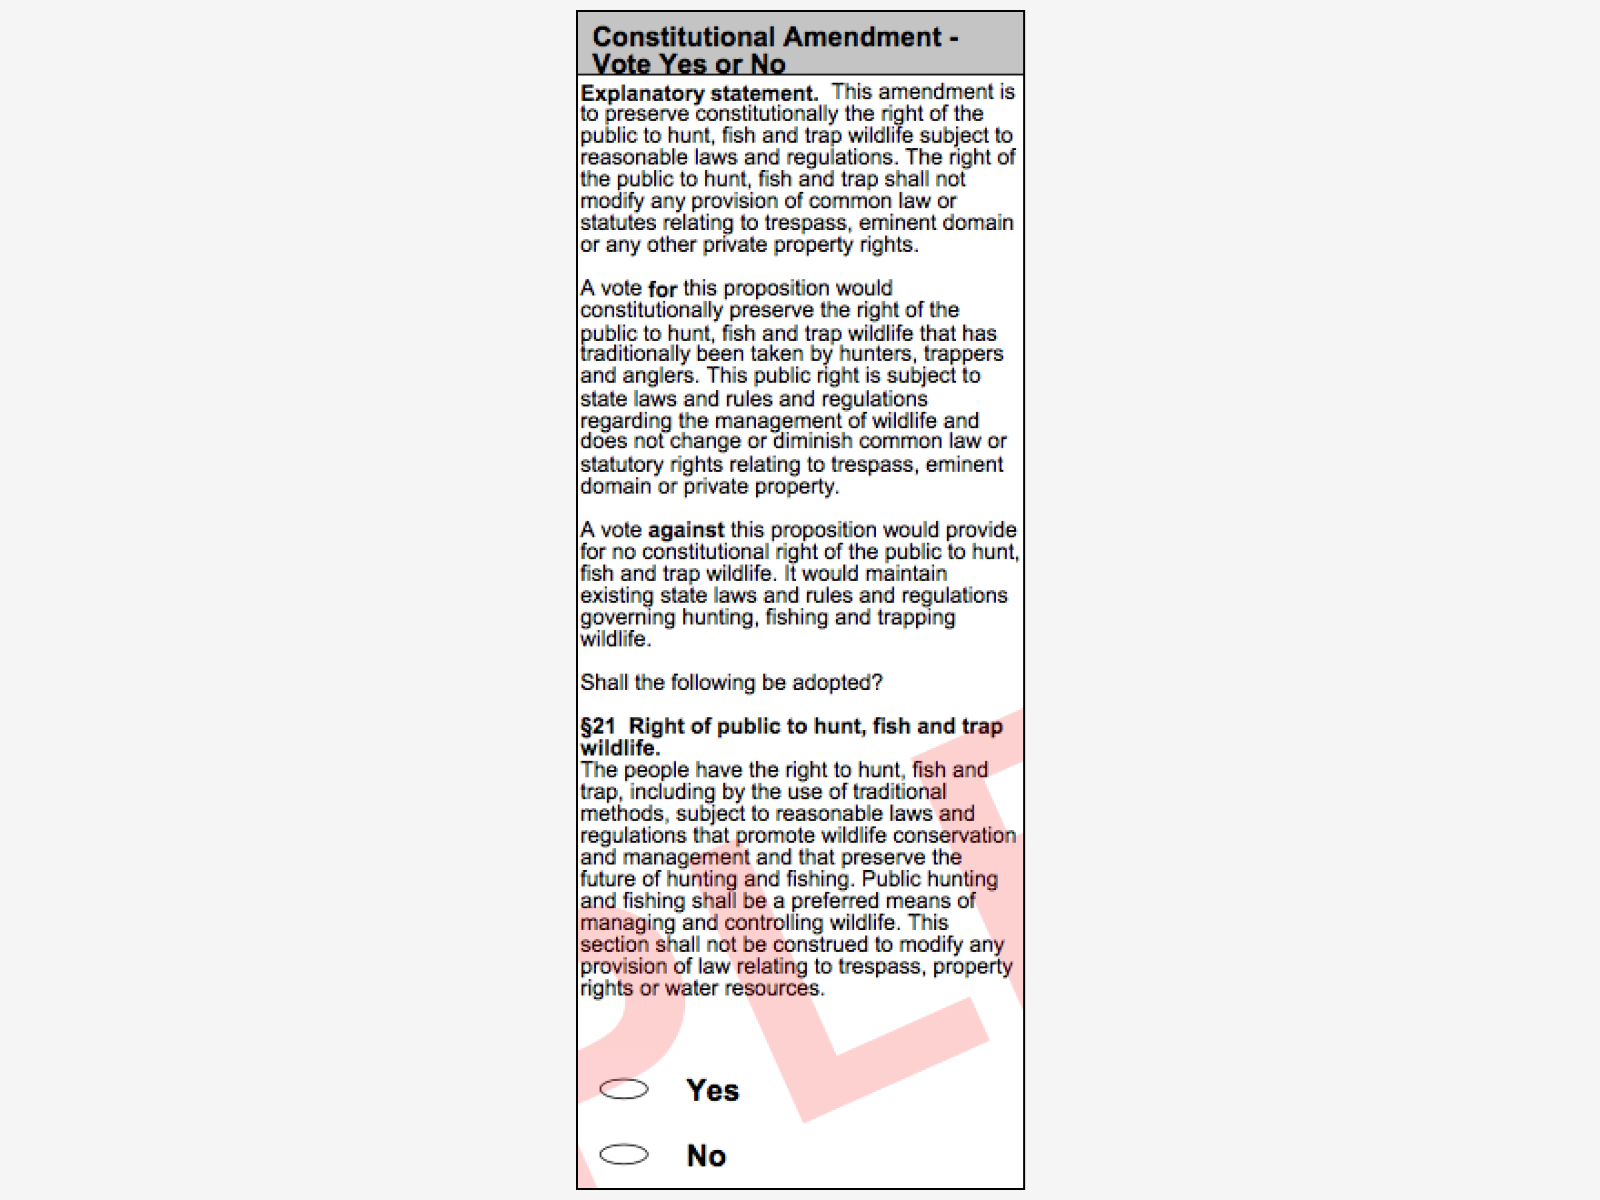
Enter the number of yes/no retention votes. Here’s an example:

Once you’ve provided all your ballot details, tap Next.
Voting method
Next, you’re asked to provide information on the voting method that you’re observing.
- Voting mechanism: Are voters using paper ballots, or are they using electronic voting machines?
- If electronic, touchscreen? If you selected electronic voting, are the machines touchscreen equipment? (No selection is available if you chose paper voting.)
- Voter-verified paper audit record? If you selected electronic voting, does the equipment produce a paper record for voter verification, or does it not? (No selection is available if you chose paper voting.)
For consistency, you can only time voters using the same voting system. If your polling place has paper ballots as well as electronic equipment, you should record times for only one of those methods.
- Email: Finally, provide an email address. We ask this so that the researchers can contact you if needed. Don’t worry: your email address will not be used for any other purpose.
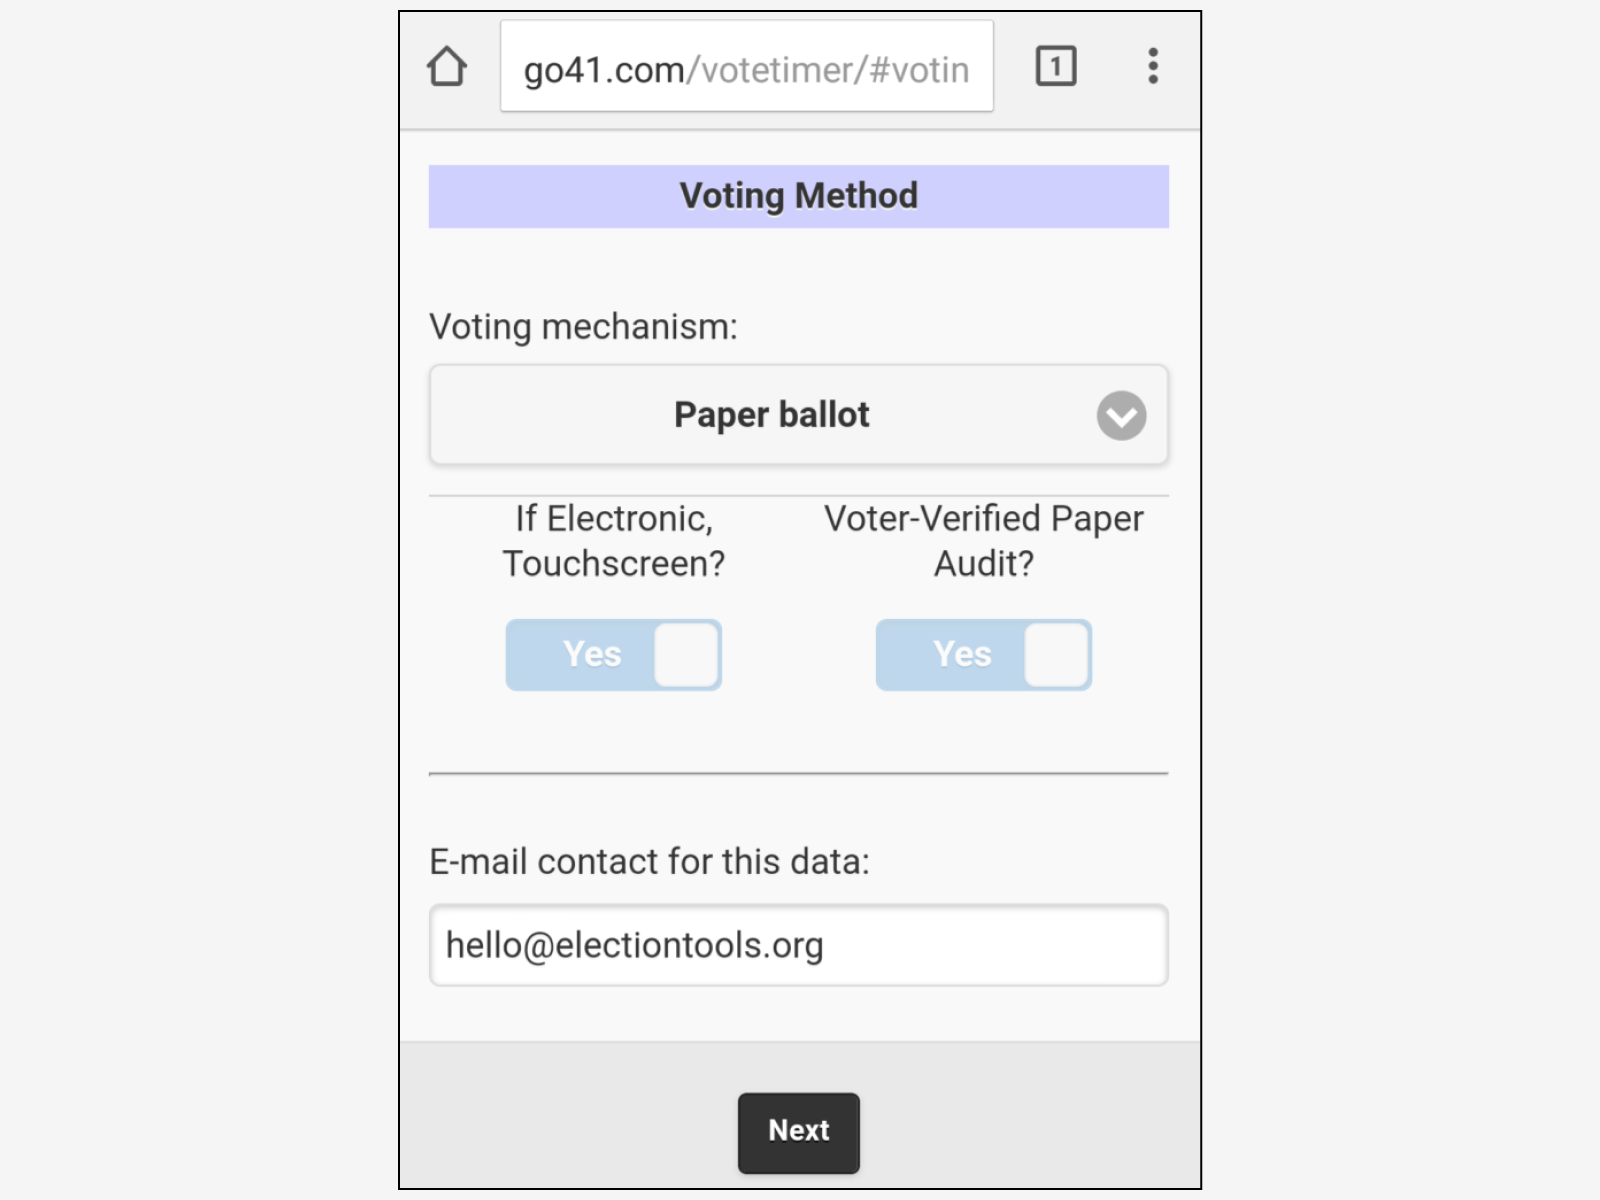
Once you’ve provided your voting details and email address, tap Next.
You’ll be directed to the Voting Timer, which means you’re now ready to observe voters and record their voting times.
Using the toolUsing the tool
Learning the timer’s functions1. Learning the timer’s functions
Let’s start by taking a moment to get familiar with how the app works. The four controls for timing voting booths are at the center of the timer, but there are additional features at the top and bottom.
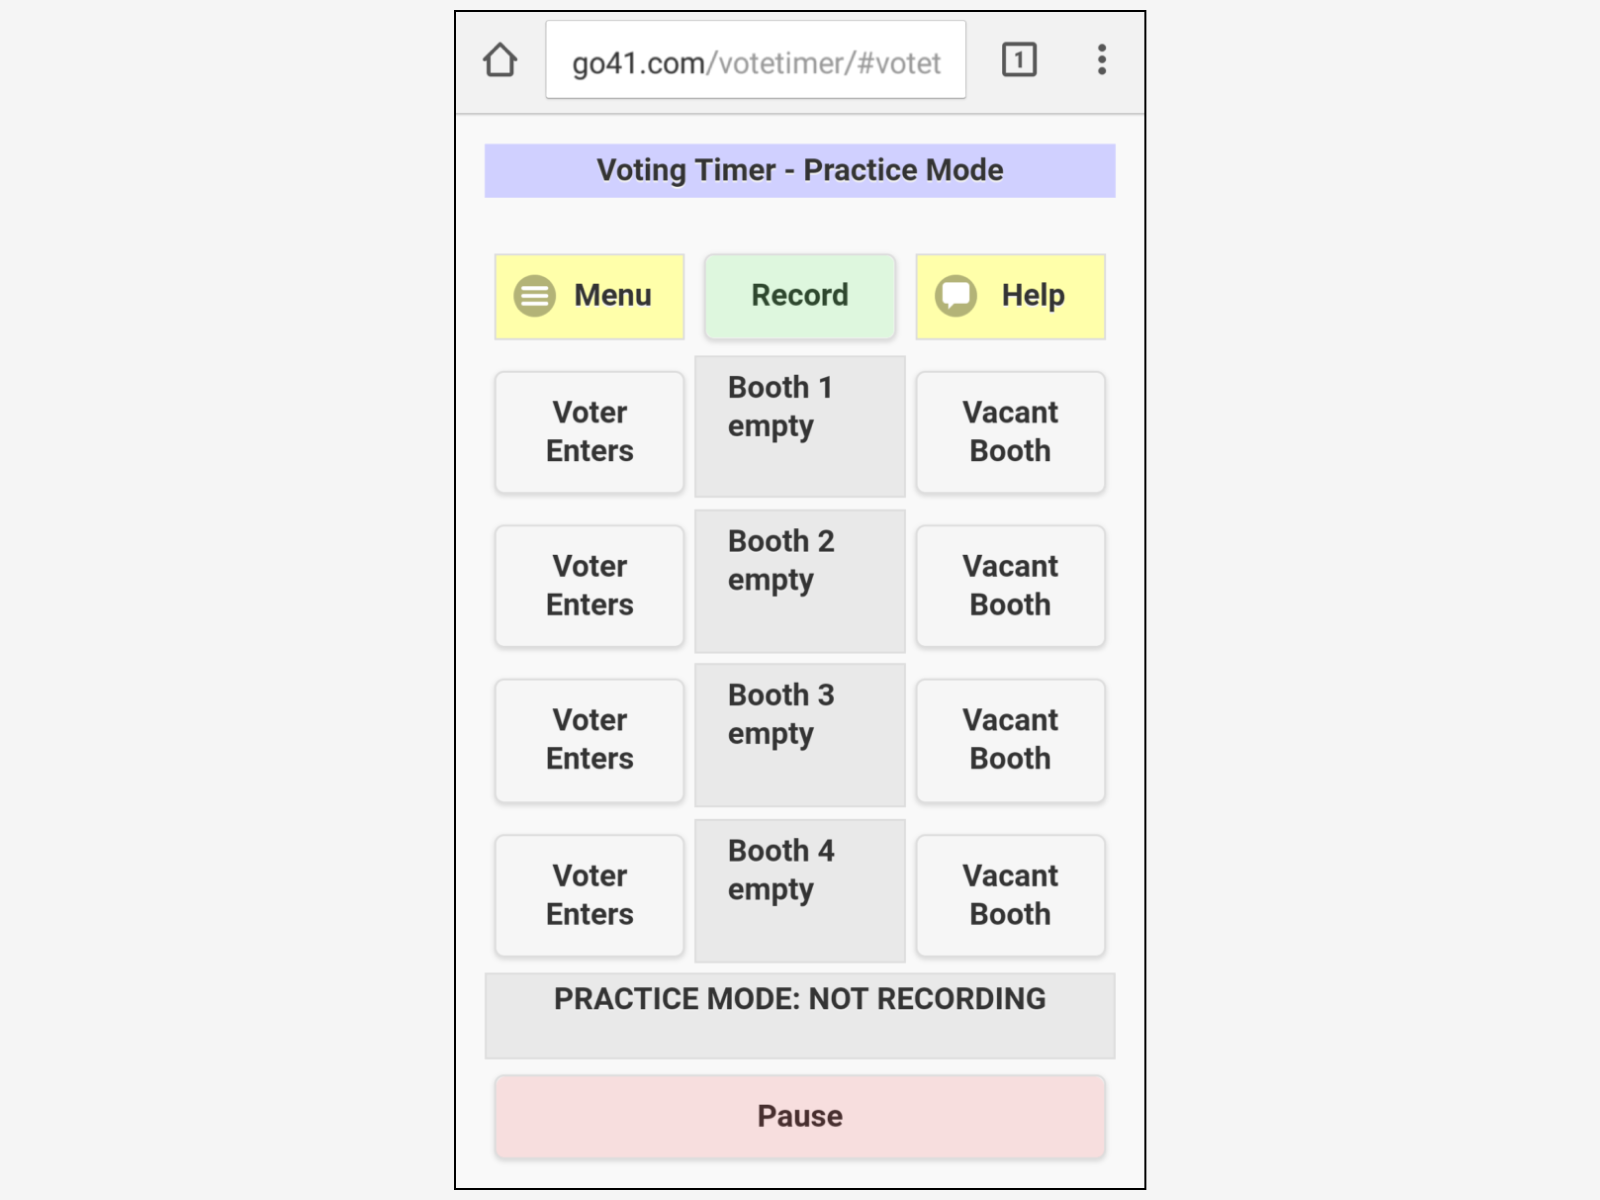
Menu: lets you return to the Introduction, Location Details, Ballot Details, and Voting Machine Details pages.
Record: connects to the database so that you can upload your data while you collect it. Uploading your data is optional; if you prefer to remain anonymous, you can use the app in Practice Mode. But if you want to download your voting time data, and if you want to contribute to the research, you need to record.
Help: provides brief, helpful reminders about how the timer works.
Status bar: displays a running total of the number of voters you’ve logged and the average voting time so far. If you’re recording, the number of voters whose times you need to upload will appear here, too.
Pause: clears the timers (without adding their figures to the running average) and pauses the app. You should hit the pause button if you get distracted and lose track of voter movement. To resume logging voters, just tap one of the Voter Enters buttons.
Guidelines for observing voters2. Guidelines for observing voters
Using the Voting Timer App is easy. But getting the logistics set up and observing voters with discretion requires consideration. So, before we get to the mechanics of timing voters, let’s cover some common questions.
Who should run the app?
To allow for focus, we recommend having a dedicated person use the timer without the distraction of additional tasks. But keep in mind that timing voters doesn’t need to be an all-day commitment.
If you haven’t already gotten approval to time voters, we advise you to contact your local election authority to check on policies regarding being in the polling place, using mobile devices, and observing voters.
How should we prepare the mobile device?
If your mobile device’s screen turns off after a short period of time, you should change that setting. Similarly, remember to bring a charger, replacement battery, or a second device if you plan to time voters for more than an hour or two.
How many booths should we time?
The app can time up to 4 voting booths simultaneously. But if you prefer to monitor fewer booths, that’s fine. The app will function just as well (but will require more time, of course).
Consider labeling the voting booths. Putting a visible number on the booths might help you log activity more quickly.
What kind of election should we time?
You should time every kind of election, including early voting. Since the app asks you to list ballot contents, it can accommodate all election scenarios.
Who should we time?
You should time every kind of voter — including voters getting language help from a family member or poll worker, voters with disabilities, and elderly voters. As long as they’re using the same ballot and equipment, they should be part of the sample — because they’re part of the community.
Does the ballot matter?
Yes! Make sure that all voters you’re timing are using the same ballot. If you have more than one ballot at your polling location, time only one of them in order to get consistent results.
What if a voter needs to return to the voting booth?
Sometimes voters spoil ballots and need to get a replacement. Sometimes voters leave the voting booth, discover they’ve undervoted, and return to the booth to complete their ballots. You might be tempted to avoid timing these voters who leave a booth and then return, but you should time them anyway. This is a common voting experience, so it should be reflected in your sample. Just treat their second session in the booth as if it’s a new voter.
How many voters make a good sample?
As a general rule, the more voters you time, the more representative your sample will be. Larger samples help avoid sampling errors — for instance, the influence of a few unusually fast or unusually slow voters.
If you want a specific number, you can think of 30 voters as a satisfactory minimum and 50 as a goal.
How should we interact with voters?
When using the timer, be as discreet as possible. It’s common for voters to feel nervousness when they vote, and if they think you are timing them, their anxiety will increase.
Keep a comfortable distance from the voting booths, and try not to appear to be “watching” voters.
Do not discuss the timer or its findings aloud with poll workers. If a voter asks what you’re doing, just state that you’re a staff member who is monitoring the voting process to make sure it runs smoothly.
Remember that while your research on voting times is important, ensuring a comfortable experience for voters is more important.
Recording voting times3. Recording voting times
Now you’re ready to record voting times. First we’ll walk you through the process of recording, and then we’ll provide instructions for logging activity in the voting booths.
If you’re working in an area without internet access, you can still use the app. Refer to the section below on using the app without an internet connection.
Recording (or practicing)
Before you begin timing voters, decide whether you want to connect to the database and record your data or remain in Practice Mode. We recommend recording so that you can download your stats and contribute your data to the database.
To remain in Practice Mode, simply take no action. The timer starts in Practice Mode by default.
To record, tap Record.
If your connection is successful, you’ll see a pop-up window asking you to confirm the location, ballot details, and voting system information you provided earlier. Review the information and click Okay. When you do, the green button toggles to read “Stop.”
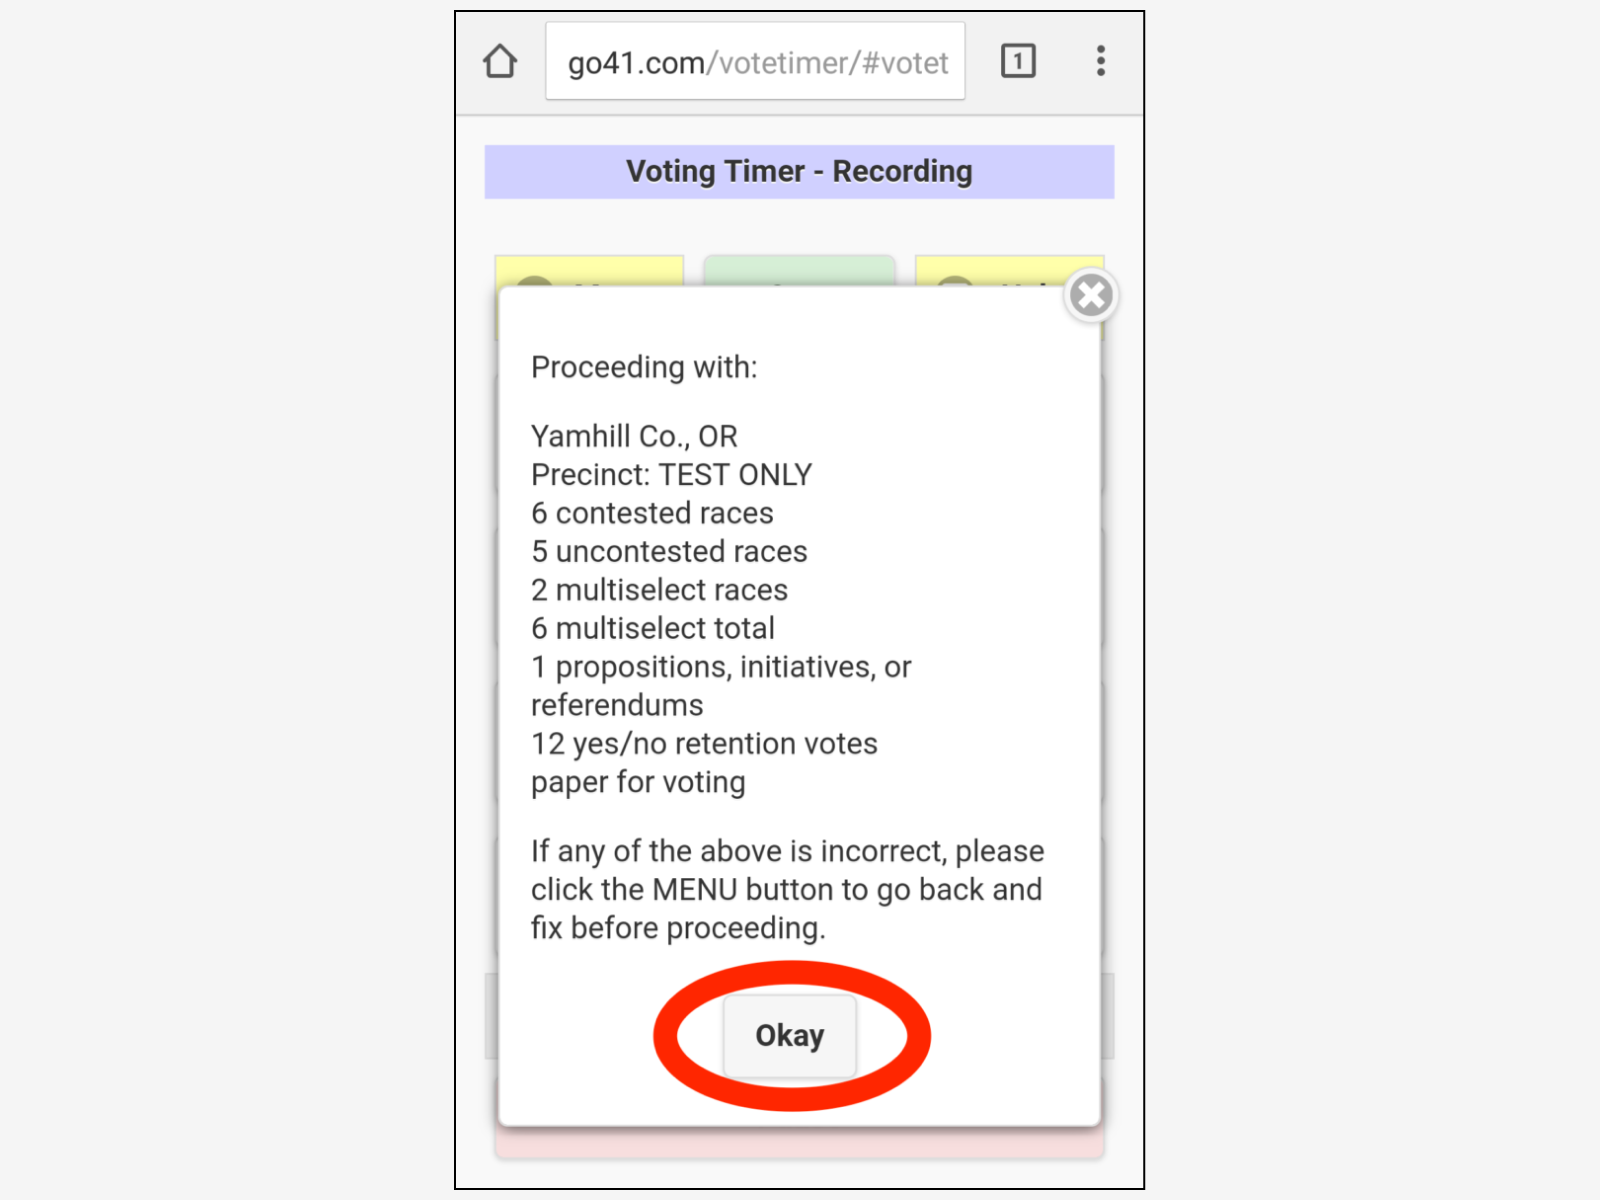
If tapping Record doesn’t do anything, it’s because you still need to enter information about your location, ballot, and voting system. Going to the top left of your screen, tap Menu, select a page to return to, and enter in the information needed. Then go back to the timer and try to connect again.
There’s no need to stop recording data until you’re done with the entire vote timing process. Once you’re fully done, just tap Stop.
Timing voters
When a voter enters a voting booth, tap the Voter Enters button for that booth. The timer starts. When you see the voter leave, quickly prepare to take 1 of these 2 actions:
- If there’s a new voter ready to take the departing voter’s place in the booth, tap the Voter Enters button again. Just wait for the new voter to approach the booth, and tap the button when the new voter enters. This ends the first voter’s timing session and resets the timer for the new voter.
- If there isn’t a new voter ready to use the booth, you’ll tap the Vacant Booth button. This ends the departing voter’s timing session but does not begin a new one.
Once you’re done timing voters, ensure that all timing sessions are closed and the timers all read “empty.”
If you’re recording, tap Stop to stop recording.
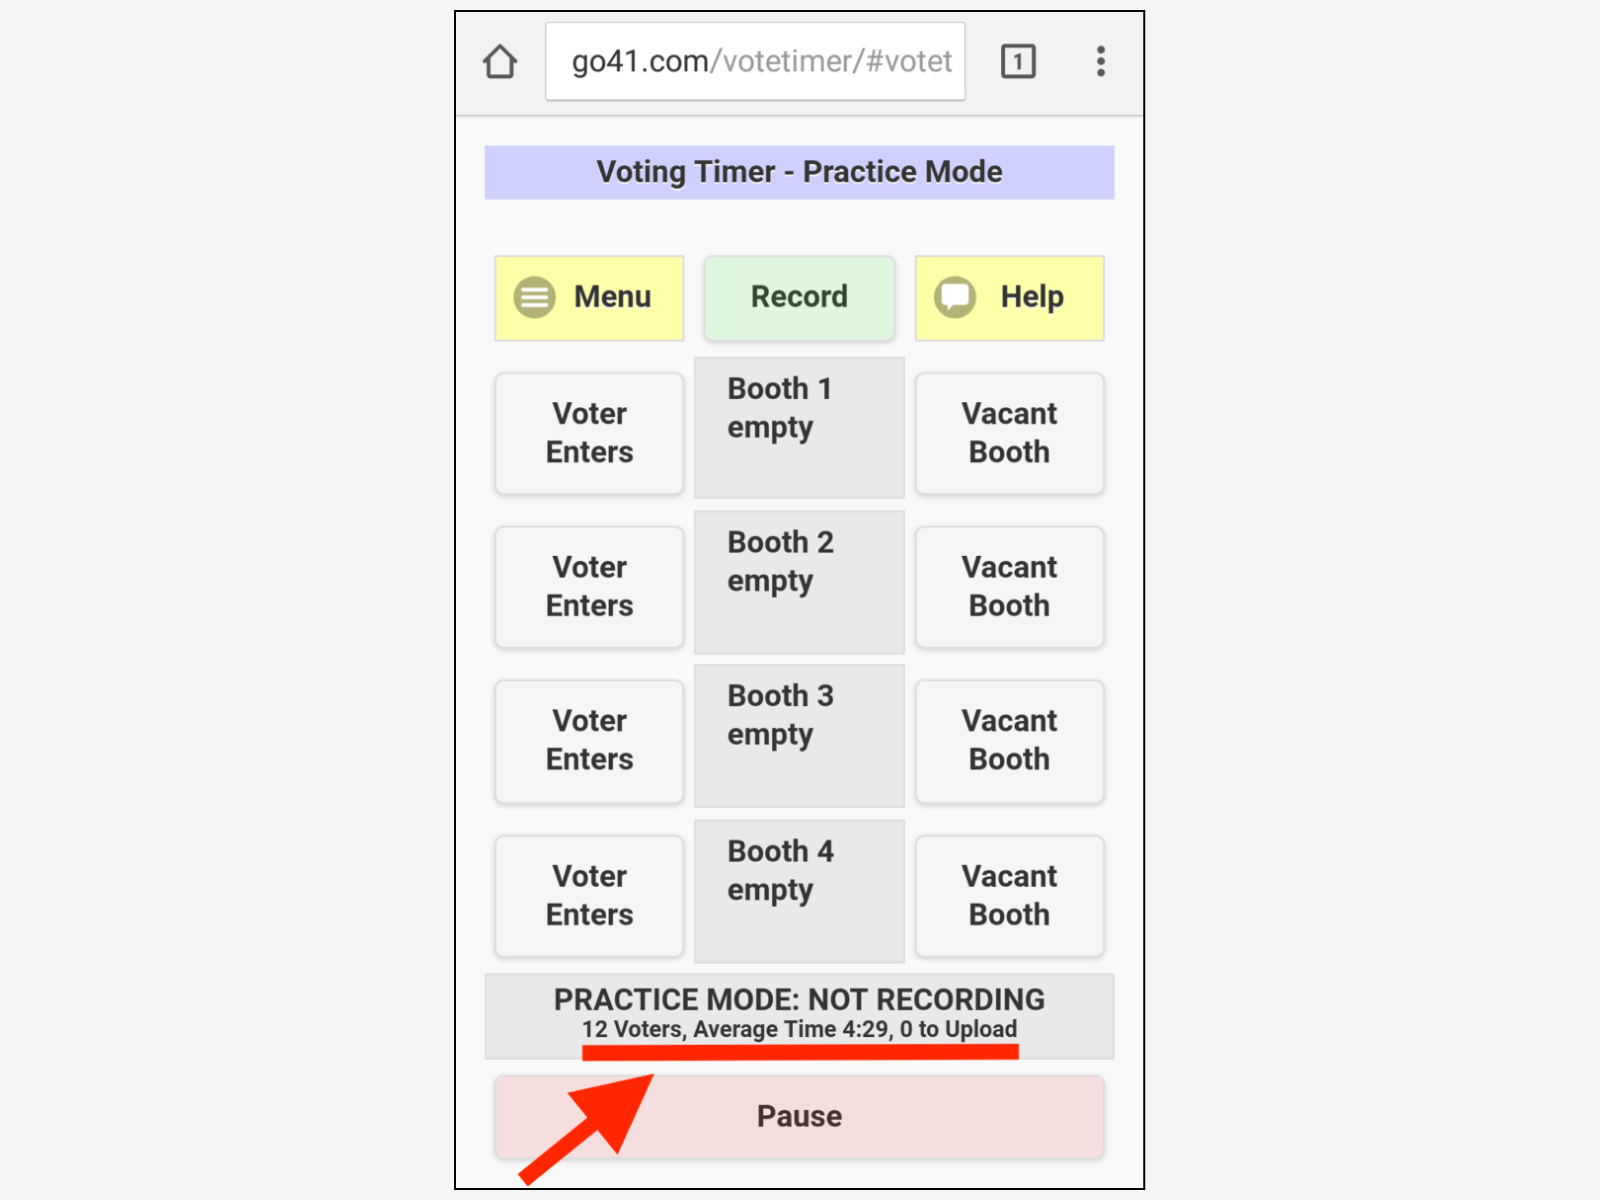
When you’re back online, tap Pause/Upload to upload the times you recorded offline.
If you’re using the app offline, you can upload your data later if you need to shut down your device or close the app. Before you power off your device or close your browser, tap Stop to ensure that any recorded times are properly saved. When you’re ready, restart your device, connect it to the internet, and restart the app by going to the home URL (https://go41.com/votetimer). You’ll see a confirmation message reading “Stored timings have been successfully uploaded.”
Downloading your timing data
These instructions for downloading your data apply only if you connected to the database while using the timer. If you used the app in Practice Mode, the number of voters timed and average voting time are the only data you have access to.
The Voting Timer’s stats request function is designed to be used on a computer, so we suggest accessing your data on a computer rather than a mobile device.
To keep your data secure, we create an encrypted stats link for your data. Both the timing app and the stats tool use secure, encrypted communications. When we send you the link, you may choose who has access to your reports.
To begin the process and request your link, please send an email to support@ElectionExcellence.org. Send the email from your work email address. Include your name and the name of your election office.
After we receive your request, we’ll create the encrypted link and send it your way. When you get our email, click the link included to access the Voting Stats Request Page.
If you’d like to experiment with the stats functions using some sample data we created, use this encrypted link: https://go41.com/votetimer/stats/?Sb7LBO5-lq.YFb1Dvs.75-h.
First, select the start and end dates for the data you want. You can leave the default range or use the date selections to bracket the election you want to study.
Then, select the format you want and click Fetch.
You have 4 options for the format of your data.
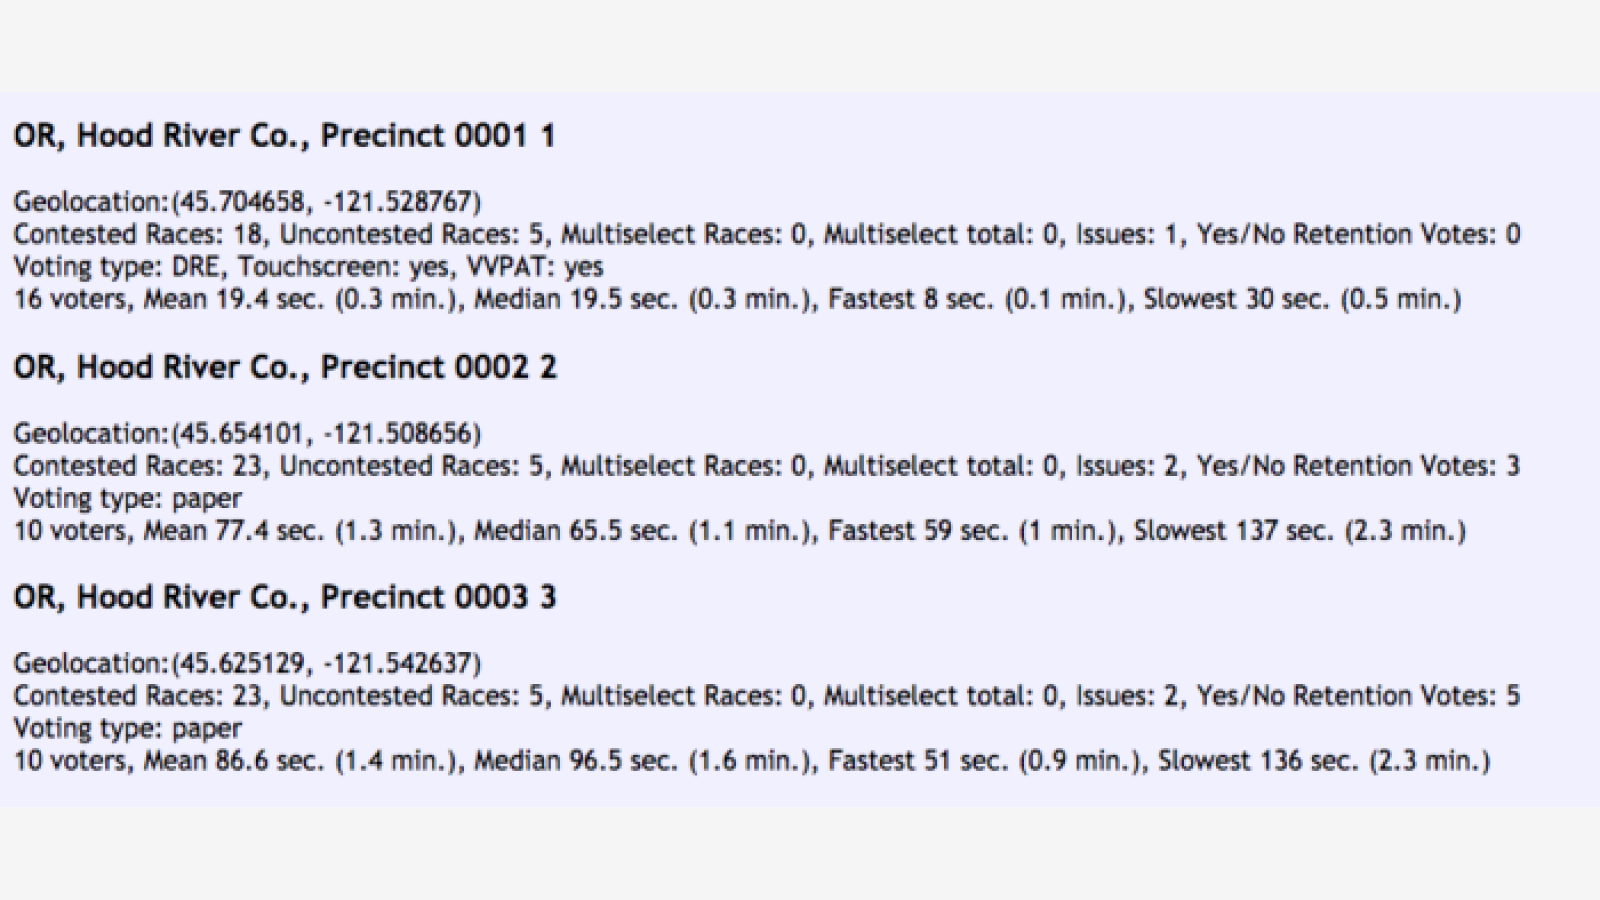
1. Summary page
The summary page format provides a concise overview of your vote time data in a browser.
2. Map
The map format displays geolocation information for all of your datasets on a Google Map.
3. Summary spreadsheet
The summary spreadsheet option lets you download a CSV file that can be opened in any spreadsheet program — like Excel.
This spreadsheet contains the same data as the summary page but in a format that allows for editing, sorting, and uploading to a management or visualization platform.

4. Timings spreadsheet
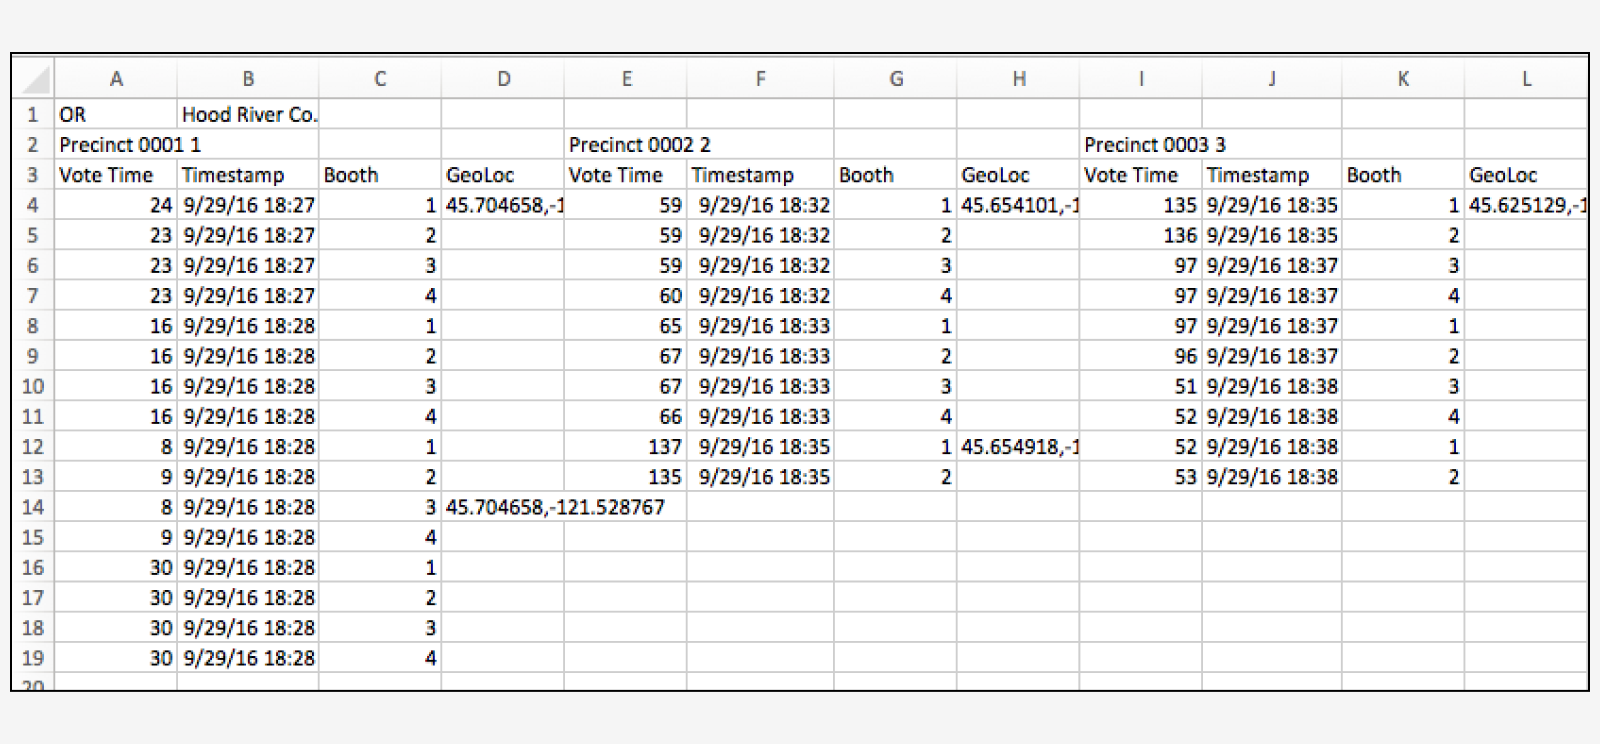
The timings spreadsheet option lets you download the most comprehensive data and allows for editing and sorting, as all spreadsheets do.
This spreadsheet does not contain information on ballot or voting system, but it includes details for each set of precinct times: vote time (in seconds), timestamp, booth number, and geolocation.
Regardless of the format that you use, keep in mind the following security notes.
First, the timestamps and geolocation markers allow you to cross-check the validity of your data.
Second, each set of precinct times is also matched to a device ID. This means that if 2 people record timings at the same precinct with different devices, they will show in the reports as 2 different sets with that precinct name.

