3 Standards
Pocket voter guide template
A template for printed voter education materials covering 8 bite-sized topics
Intended User
Election Phase
Office Size
Estimated Time to Implement
Authoring Organization
What you’ll need
- Download the Pocket Voter Guide Template (.pptx file, 1.1MB)
- The person in your office in charge of creating voter outreach materials
- Microsoft PowerPoint (or Google Slides)
- Adobe Acrobat Reader
- Printer and paper to print the guides
Getting started
Downloading the template
The first step to creating your pocket voter guide is downloading the template (found above).
The template is a Microsoft PowerPoint file. You can edit it using Microsoft PowerPoint or Google Slides. But PowerPoint is our recommended program, as some features or functionality may be lost by using Google Slides.
After the file is downloaded, locate it and open it.
If the file doesn’t open, you may not have PowerPoint on your computer. For the next steps, refer to your office IT manager or visit the Microsoft Office website to purchase the program.
If the file opens, you’re ready to edit the template.
Using the toolUsing the tool
Customizing the pages1. Customizing the pages
Page 1: cover page
The pocket guide’s cover page should clarify who is issuing the voter guide, explain which election or year the guide covers, and provide contact information.
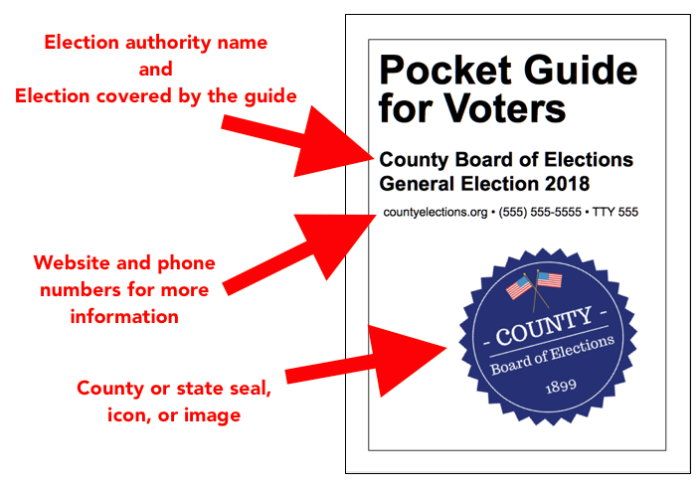
To edit text, just click the text area, delete the placeholder text, and type your information. You can move text blocks as needed, but avoid shrinking the font size. Keep your text easily readable.
To edit the image, first select the placeholder image and delete it. Then, insert your new image by dragging and dropping it or by going to the Home menu, selecting Picture, then Picture from file, and then locating your image. You’ll likely need to resize your image. To do so, right-click it, select Size and Position, and specify your desired size. You’ll follow this same process when editing the civic icons included in the guide.
When you’re happy with the cover page, save your work and move on to page 2.
Page 2: Voter Rights
To edit the Voter Rights page, refer to existing “voter rights” documents issued by your state or elections office.
Read the bulleted list of rights and consider if they apply in your area, paying special attention to details, like the numbers underlined in the example below.
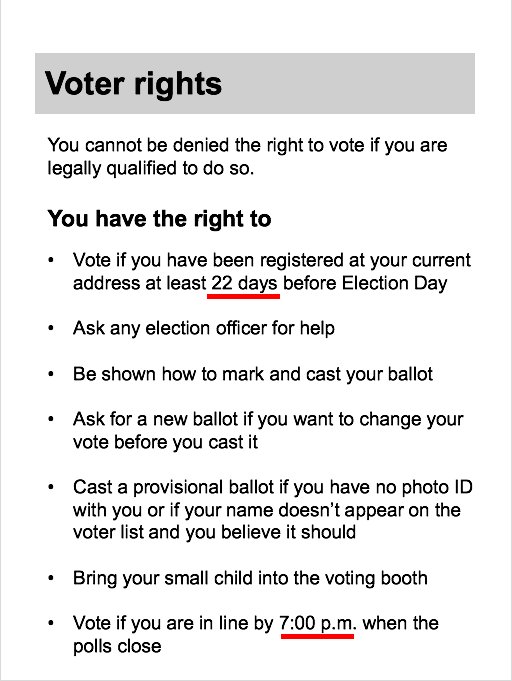
If some of the rights don’t apply, delete them. If some rights need to be edited for accuracy, edit them. If you wish to list rights not included in the template, add them.
Since this page is oriented upside down in PowerPoint, edits can be a little awkward. Consider printing the page, if you haven’t already, or do your best for now and make a plan to proofread once your editing is done.
When you’re happy with the Voter Rights page, save your work and move on to page 3.
Page 3: Ways to Vote
Page 3 covers voting options: voting at the polls on election day, voting early in person, and voting absentee.
If these options apply in your area, just edit details like dates, times, and contact information, as underlined in the example below. Note that “State” is a placeholder for your state name.
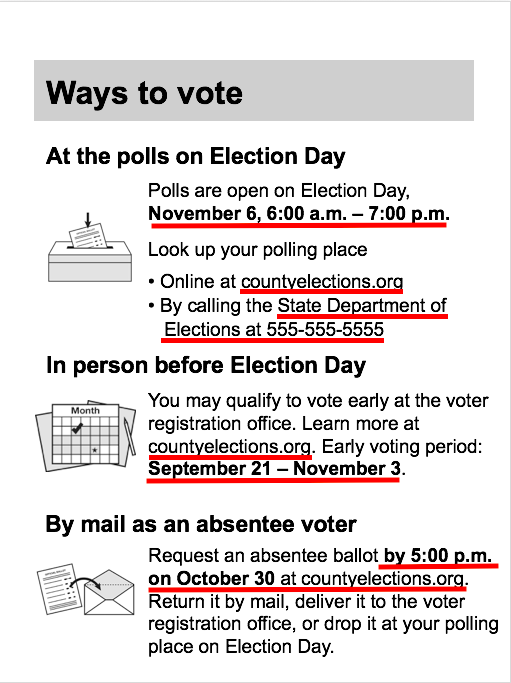
If the voting options in the template don’t apply in your area, or if you want to add options, you’ll need to make more significant changes.
For example, if your area doesn’t provide early voting, you can click the heading, icon, and text for early voting and delete them one by one. In the example below, we deleted the early voting option and moved the in-person and absentee voting sections to make use of the new space.
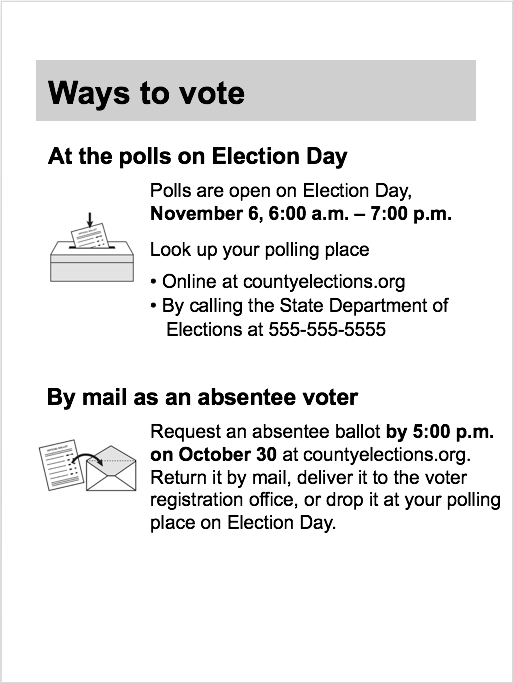
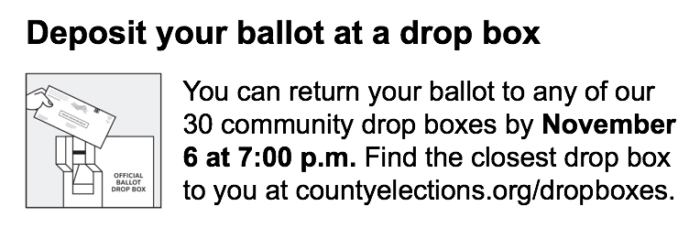
Similarly, if your community has ballot drop boxes, add a section like the one below.
When you’re happy with the Ways to Vote page, save your work and move on to page 4.
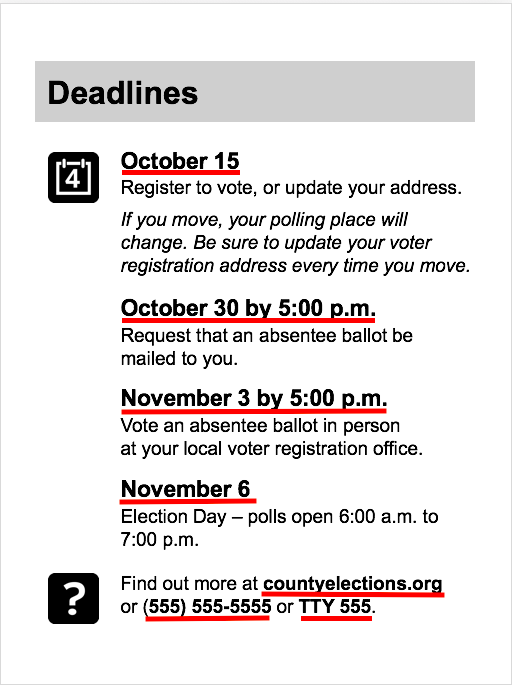
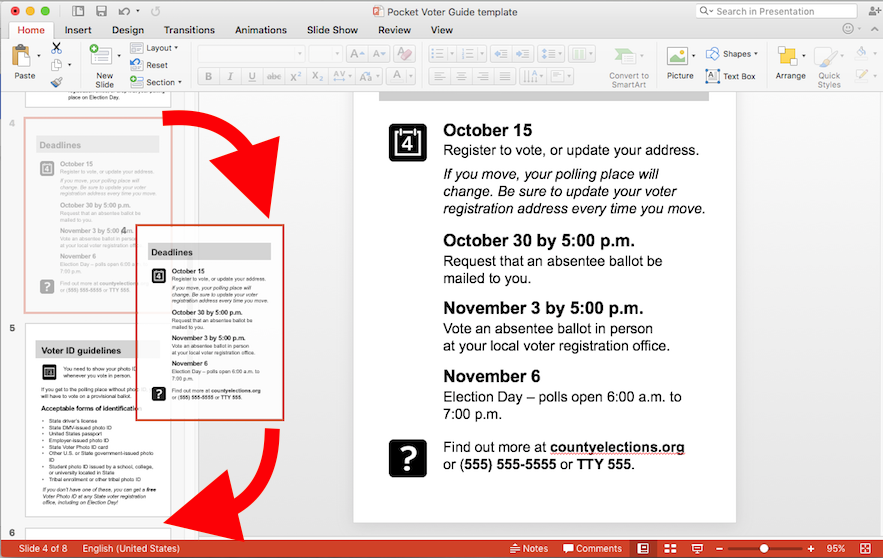
Page 4: Deadlines
To edit the Deadlines page, you’ll need deadline dates and times for voter registration, requesting an absentee ballot, voting an absentee ballot in person, and you’ll need the date and voting hours for Election Day.
If any of the placeholders don’t apply, edit them.
Finally, be sure to edit the contact information at the bottom.
When you’re happy with the Deadlines page, save your work and move on to page 5.
Page 5: Voter ID Guidelines
Because your edits to the Voter ID Guidelines page will depend on ID policies in your area, this page will require more changes than most. In the template, this page states that a photo ID is required to vote, lists accepted forms of ID, and notes that free IDs are available to people who need one.
You may want to keep this page even if your area doesn’t require ID. Just edit the text to explain how voter identification works in your area.
If your area requires different forms of ID, edit the bulleted list. Again, “State” is a placeholder for your state name.
If you have a program for providing IDs, edit the statement at the bottom for accuracy. If not, delete it.
In the example below, we edited the Photo ID page to reflect ID policies in Pennsylvania.

When you’re happy with the Voter ID page, save your work and move on to page 6.
Page 6: What to Expect at the Polls
For the What to Expect at the Polls page, you’ll need to compare the steps described in the template to voting procedures in your area.
If your area holds in-person voting at polling places, you may need to only make minor edits. You’ll notice this page includes two references to voter ID laws, as underlined below. Edit these as needed.
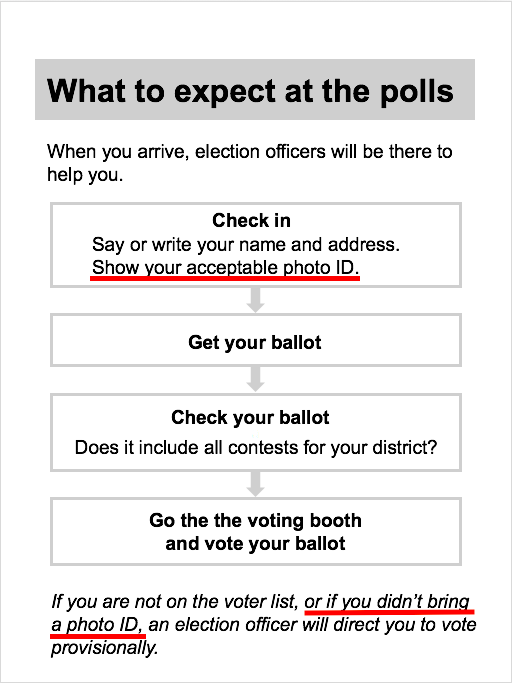
If your area conducts elections only by mail or uses vote centers instead of traditional polling places, you’ll likely want to rework this page to clarify those processes.
Need to change a page header? You can easily edit “What to Expect at the Polls” to something more relevant to your area, like “How to Vote By Mail” or “Voting at Your Local Vote Center.”
To edit this heading, you need to edit it in the master slide. Go up to click the View menu and then select Slide Master. There, you can click the text and edit it. When you’re done, go to the menu and click Close Master. Your new heading should appear on the page.
When you’re happy with the What to Expect page, save your work and move on to page 7.
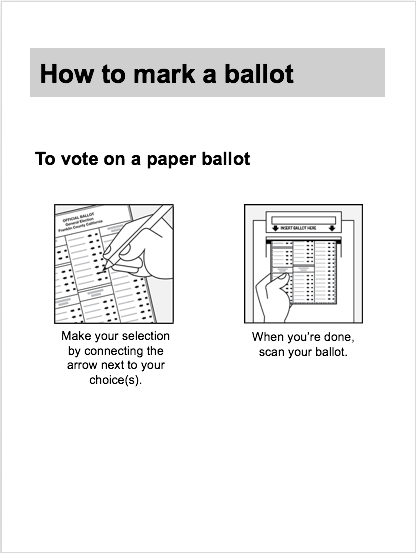
Page 7: How to Mark a Ballot
The template’s ballot marking page includes instructions for fill-in-the-oval paper ballots and touchscreen direct-recording electronic (DRE) voting equipment. If that’s what you have, you can keep things as they are.
If not, edit the ballot marking descriptions and icons. You can download a new ballot marking icon from the Civic Icons and Images collection.
If you have only paper ballots or only electronic voting equipment, remove the references to the system you don’t have.
In the example below, we edited the page to show connect-the-arrow paper ballots as the only voting option.
When you’re happy with the What to Expect page, save your work and move on to page 8.
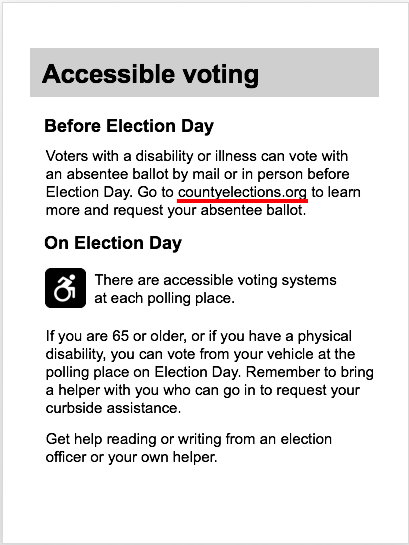
Page 8: Accessible Voting
The Accessible Voting page provides information on voting for people with disabilities.
The template includes information for voting by mail, in person before Election Day, and in person on Election Day. If you have more or fewer accessible voting options, edit this content.
Also, be sure to edit the contact information, as underlined below.
When you’re happy with the Accessible Voting page, save your work. This is the last page, so consider if you need to make any additional changes before your voter guide is ready.
Swapping pages around2. Swapping pages around
Would you like to change the page order? Did you make a mistake that’s hard to fix? Do you want to replace a page that’s not relevant in your area? The template offers a lot of flexibility.
Changing page order
To change page order, go to PowerPoint’s slide pane at the left and select the page you’d like to move. With the slide still selected, drag it up or down to the position where you want it. If you make a mistake, just undo and try again. Repeat as needed.
Restoring a page from the template
If you made a mistake and would like to restore an original page without losing your work on other pages, you can download an individual page from the template and insert it back into your voter guide to try again.
Download the page you need from the list below. To add it to your guide, go to PowerPoint’s Insert menu, then select New Slide, and then Reuse Slides. Locate your file and click OK. Now, you just need to drag and drop the page into your desired position.
[there is a table here of all the individual download links]
- Download Cover Page template (.pptx file, 147 KB)
- Download Voter Rights page template (.pptx file, 37 KB)
- Download Ways to Vote page template (.pptx file, 295 KB)
- Download Deadlines page template (.pptx file, 213 KB)
- Download Voter ID Guidelines page template (.pptx file, 135 KB)
- Download What to Expect at the Polls page template (.pptx file, 37 KB)
- Download How to Mark a Ballot page template (.pptx file, 315 KB)
- Download Accessible Voting page template (.pptx file, 143 KB)
Replacing an irrelevant page with a more relevant one
You have two options if you’d like to replace one of the template’s original pages with a new page that’s more relevant to your community. You can delete all of the original page content, edit the heading in the master, and build a new page from scratch. Or, you can download one of the page templates that we’ve created for you and insert it into your voter guide.
There are many ideas for new pages, but the three templates below provide a few good options. There’s also a blank page template that you may find helpful.
[table of the auxiliary pages to download]
- Download Contact Information page template (.pptx file, 41KB)
- Download Running for Office page template (.pptx file, 41KB)
- Download Poll Worker page template (.pptx file, 53KB)
- Download Blank page template (.pptx file, 25KB)
Once you’re happy with all of your customizations to the template, make sure to save your file one last time. You’re now ready to print and distribute your voter guide.
Printing your voter guide3. Printing your voter guide
To print your guide, you’ll need to have Adobe Acrobat Reader installed on your computer. Other PDF readers, such as Apple’s Preview program, will not work for this job because they lack essential printing functions. If you don’t have Adobe installed, download the reader for free at the Adobe website.
Exporting your guide as a PDF
The first step to printing your guide is to export it as a PDF.
Open your guide in PowerPoint. Then, go to the File menu and select Export. You can specify the location where your file will be saved, give your new file a new name if you like, and then go to the File Format dropdown and select PDF. Then, click Save.
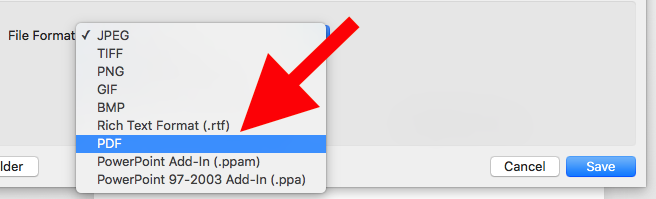
PowerPoint will export your slides as a PDF and place the file in the location you specified.
Printing your guide
With your voter guide as a PDF, you’re ready to print.
Open the PDF with Adobe Reader. If Adobe isn’t your default program for opening PDFs, you may need to right-click (or Control + click, or two-finger click) the file, select Open with, and then select Adobe Acrobat Reader.
With your PDF open in Adobe, you’re ready to print. Go to the File menu and select Print.
You need to establish print settings so your guide will print correctly for folding. Depending on your computer and your version of Adobe Reader, your print menu may look slightly different, but the settings should be the same as the example below.
Under Page Sizing & Handling, select Multiple, and then set the Pages per sheet to 4. Page order should be set to Horizontal.
Make sure you print on both sides of the paper, select Flip on short edge, and set your Orientation to Portrait.
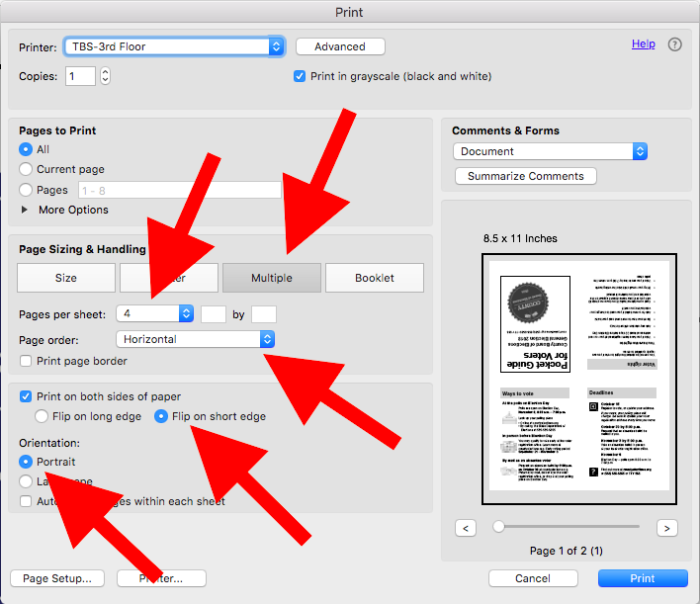
Once your settings are established, click Print.
Your printed guide should match the layout below. It may differ if you swapped pages around, but the orientation of the pages should be the same.
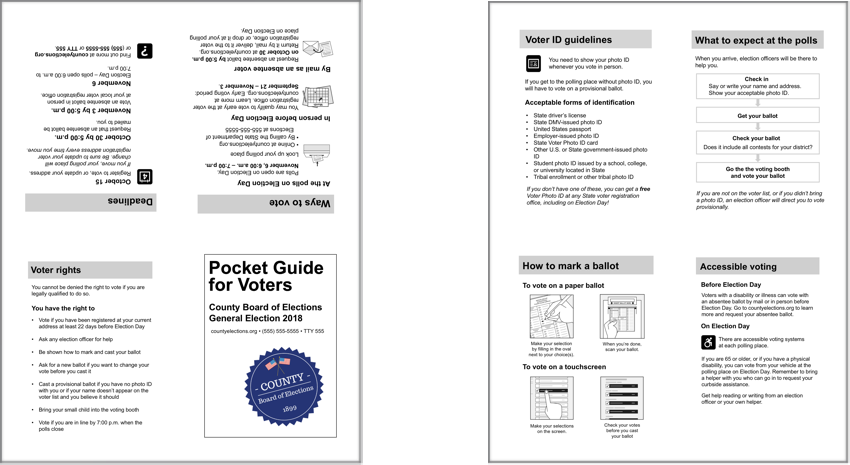
If your guide looks right, you’re ready to fold. If you had trouble printing, go back to the instructions above and double-check your print settings.
Folding your voter guide4. Folding your voter guide
Folding the guide is easy, but you need to do it right so the page orientation works.
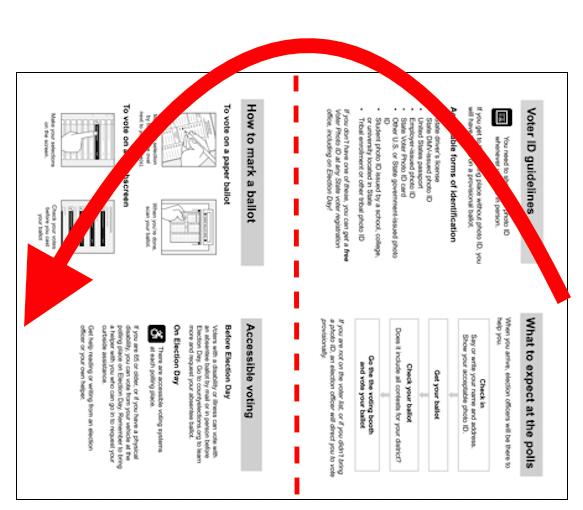
Start by folding the page longways, with the cover page facing down on your table and the four interior pages facing you. If you use the template’s default page layout, the Voter ID Guidelines page will be at the top right. Now, fold over from the right to the left.
Now, reorient your guide with the cover page again facing the table and two informational pages facing you. If you use the template’s default page layout, the two pages facing you will be Ways to Vote and Deadlines. This time, fold from left to right.
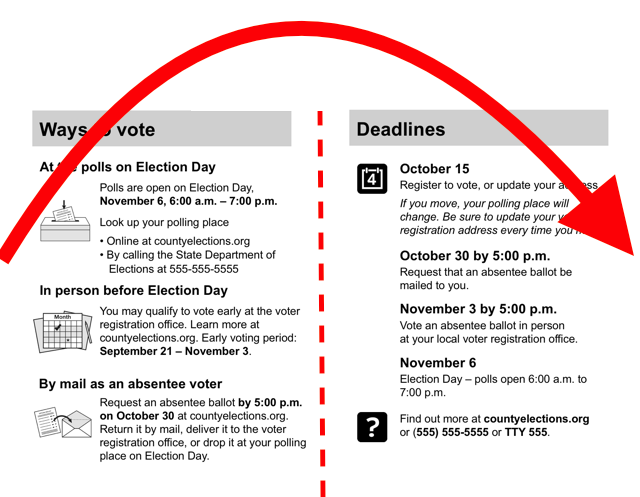
If you’ve folded your guide correctly, your cover page should be facing you. When you open the booklet, the two inside pages should be right-side up. If you open up again to the full sheet, those four pages should also be right-side up.
If you made a mistake, look back at the folding instructions and double-check your print settings.
Customizing for your officeCustomizing for your office
Any tips for customizing this resource for my office?
The voter guide template comes with placeholder information about voting. To customize it, you’ll need information about voting in your area, including deadlines, phone numbers, web addresses, and other details.
Election procedures and requirements vary greatly from state to state. Depending on your location, some pages will require minor edits, while others will require more significant changes.
For instance, if you’re making a voter guide in North Dakota, where there’s no voter registration, you’ll want to delete references to registration. If you’re an election official in Oregon, a vote-at-home state, you’ll want to change references to in-person voting. If you’re making a voter guide in Minneapolis, which has ranked choice voting in some contests, you may add a section explaining how ranked choice voting works.
To make editing easier — especially for the first two pages, which display upside down in PowerPoint — you may want to print them and write changes in pencil before editing electronically. To print in PowerPoint, go to the File menu, select Print, verify settings, and click Print.
If it’s helpful to see a finished example, you can check out this Pocket Guide created by the Virginia Department of Elections for the May 2018 election.
How do I know if this resource is helping?
Well-designed voter outreach materials such as the Pocket Voter Guide make voting easier by showing accurate and concise information. You know this resource is helping if you get fewer questions from voters in communities you hand it out to, and if turnout increases!
Which Standards of Excellence does this resource support?
- Plain language
- Information design
- Voter communications
- Community relationships
Which Values of Excellence does this resource support? Why?
Values for the U.S. Alliance for Election Excellence define our shared vision for the way election departments across the country can aspire to excellence. These values help us navigate the challenges of delivering successful elections and maintaining our healthy democracy.
Alliance values are nonpartisan and designed by local election officials, designers, technologists and other experts to support local election departments.
You may find this tool especially helpful for this Value:
- Voter-centricity. The pocket guide gives concise information to support voters in navigating all stages of voting.
To learn more about the Values for Election Excellence, and to see the full list, visit the Alliance website.
Sharing feedbackSharing feedback
How was this resource developed?
This resource was co-developed with election officials, and has been used in many elections since 2016. Share your experience with this resource and improve it for your peers by reaching out via hello@ElectionTools.org.
How do I stay in touch?
- For the latest news, resources, and more, sign up for our email list.
- Have a specific idea, piece of feedback, or question? Send an email to support@ElectionExcellence.org